 En
En
 Es
Es
This section contains information about the features of the BILLmanager 6 personal cabinet. Some features depend on the settings set by your service provider.
For support, contact your service provider via a request in your personal cabinet.
An SSL certificate is a digital document that ensures the security of the user's personal data. For example, passwords, credit card numbers, email addresses, etc. When an SSL certificate is used, the data is transmitted to the server using a secure protocol.
Ordering a service
To order an SSL certificate:
- Go to the order page using one of the methods:
- on the Home page, click Order a service → in the right menu, select SSL certificate;
- in the section Products/Services → SSL certificates → click Order.
- Select Tariff plan → click Order.
- Select Service parameters. For more information, see the section Parameters of SSL certificate.
- Pay for the order or click Order to add to the cart.
Parameters of SSL certificate
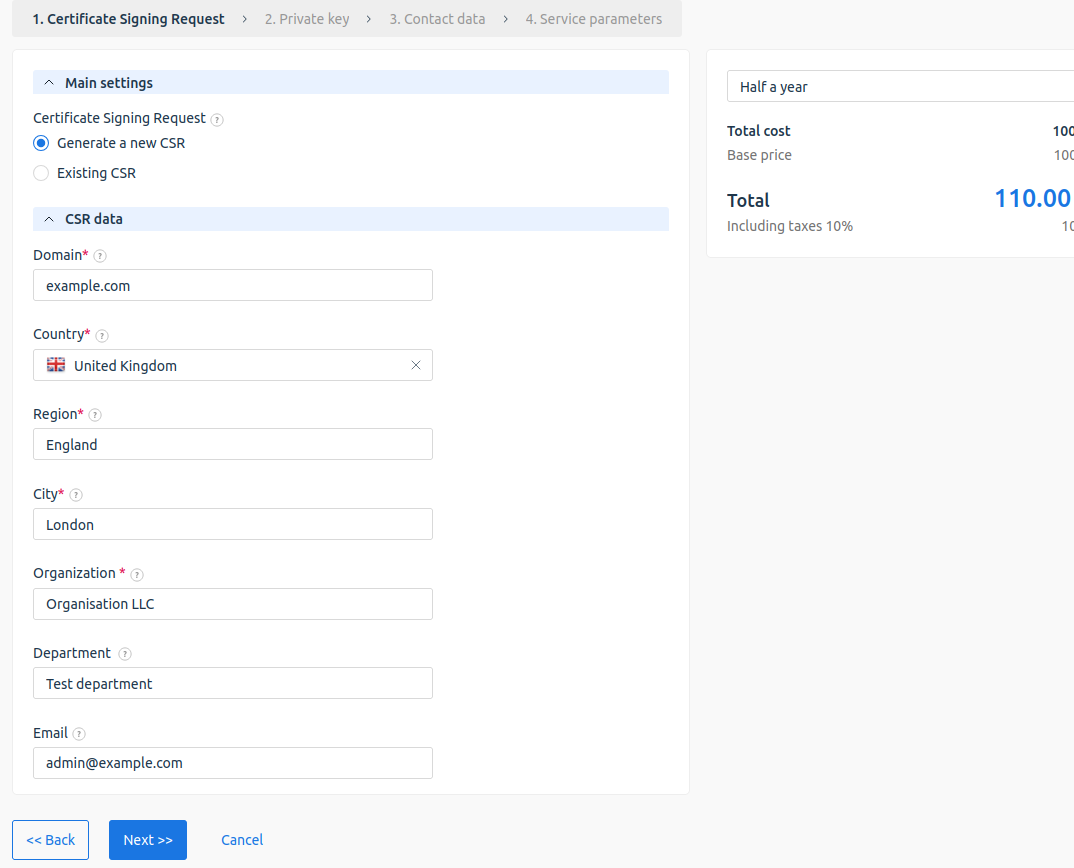
When ordering the service, specify the SSL certificate Parameters. The setup consists of a few steps:
- Complete the certificate request form:
- Choose how to send your request:
- Generate a request — specify the request data and the system will create it automatically;
- specify an Existing request — enter the Certificate request (CSR) data in the additional field. The remaining fields will be filled in automatically.
-
Specify the request data:
Use only Latin letters and numbers when filling in the fields.-
- Domain — full name of your domain. E.g.,
example.com. - Country.
- Region — region, territory, republic, etc. without abbreviations. For example, Manchester.
- City — the city or locality without abbreviations, for example, Liverpool.
- Organization — full name of the organization or full name of the individua.
- Department — the name of the subdivision of the organization.
- Email — contact email, which will be displayed in the certificate properties.
-
Alternative wildcard domains — domains that use the wildcard character (*) to indicate all possible subdomains. This allows a single certificate to protect not only the main domain, but also all of its subdomains. For example, a certificate for
*.example.comwill be valid forwww.example.com,mail.example.com,blog.example.com, and so on. The option is available if the provider has included it in the tariff.
- Domain — full name of your domain. E.g.,
-
- Choose how to send your request:
- Click Next.
-
Save the private key of the certificate.
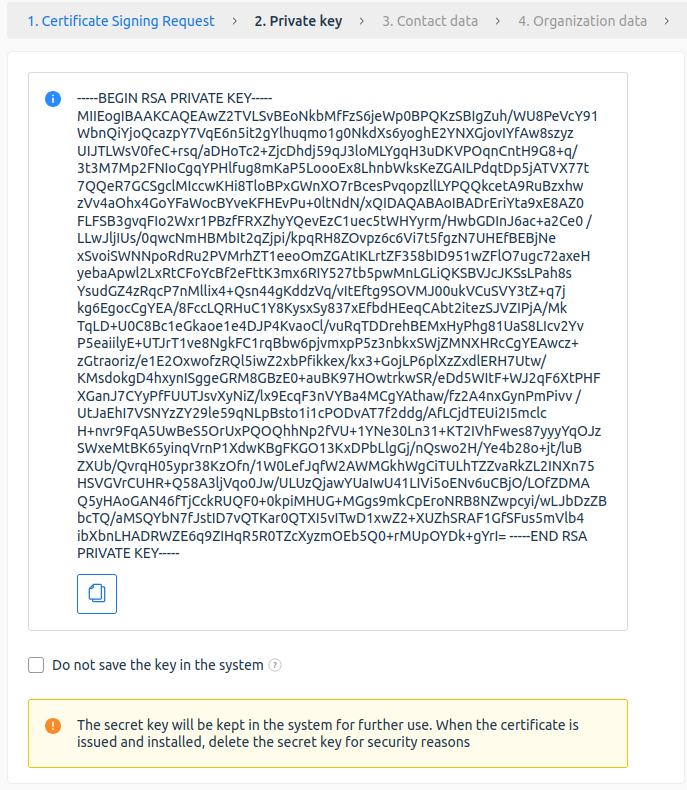
- Select the Do not save the key in the system check box if you do not want the platform to store the key data.
If you lose the secret key, you will need to reissue the certificate. - Click Next.
-
Provide contact information:
- Administrative contact — a person in a senior position with the authority to send a request for a certificate on behalf of the organization. The certification authority will send the contact person a copy of the issued certificate;
- Technical contact — aperson to whom the certification authority will send a certificate to with information about the renewal and update procedure. As a technical contact, you can Apply the administrative contact data or specify the details of the system administrator.
Do not provide toll-free numbers as a contact number.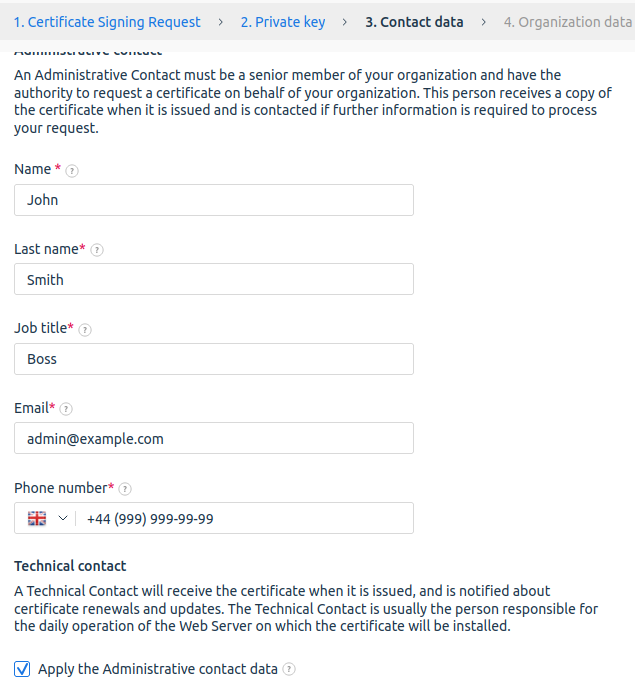
- Click Next.
-
Provide your organization's information if you are applying for an OV or EV certificate.
DetailsDo not provide toll-free numbers as a contact number. - Click Next.
-
Select Certificate validation method. Available certificate confirmation methods depend on the certificate authority:
- Email validation — select the email of the domain owner. The certificate authority will send a confirmation email to it;
Check the following:
- the selected mailbox exists on the domain and can receive incoming mail;
- you have access to this mailbox.
- By hash file — select the protocol for accessing the website: HTTP or HTTPS. The system will create a file in.txt format with a name containing an MD5-hash or SHA-hash. For the same domain, depending on the selected protocol, the hash content will differ. Place the file in the root directory of the website. The file must be accessible at the following address:
http://yourdomain.com/.well-known/pki-validation/MD5-hash.txt - DNS-based validation — select the option to create a record of type
CNAMEfor your domain. Specify the MD5-hash as the name, and the SHA-hash as the value, provided by the certificate authority in the format: Your domain:MD5-hash.example.comCNAME:SHA-hash.comodoca.com. - Via DNS-TXT record — add the value from the service to the domain DNS records. Then initiate verification via the link in the email or the button in the client area.The record is case-sensitive. Changing the case will cause verification to fail. The record is case-sensitive. Changing the case will cause verification to fail.
- Email validation — select the email of the domain owner. The certificate authority will send a confirmation email to it;
- Click Next.
- Select the service Auto-renewal conditions.
- Read the Terms of Service.
- Pay for the order or click Order to add to the cart.
- The certification authority will send a confirmation email to the specified email address. Follow the instructions in the email to issue the certificate.
SSL certificate validity periods
Starting from 2026 new rules of the CA/Browser Forum organization come into effect, limiting the maximum validity period of SSL certificates. This is done to enhance security. The platform is adapted to work with these changes.
Where:
- DV — domain validation (Domain Validation);
- OV — organization validation (Organization Validation);
- EV — extended validation (Extended Validation);
- SII — subject information(Subject Identity Information).
Subscribing to SSL certificates
Due to the reduction of certificate validity periods, certificate authorities offer an SSL subscription model. This allows purchasing a certificate for a long period (for example, for 1–5 years), while the technical certificate will be reissued automatically in accordance with the new rules (every 200, 100, or 47 days).
With a multi-year subscription, you pay for the certificate several years in advance and reissue it annually. In the client area, two different dates are displayed for such a certificate:
- Expiration date — the expiration date of the current certificate (according to CA/Browser Forum rules);
- Paid until — the expiration date of the paid subscription period.
For example, your client orders and pays for an SSL certificate April 02, 2026. for 5 years. After successful processing, two fields are displayed for this certificate in the client area: Expiration date and Paid until. The field Expiration date will show the date October 19, 2026 — the date until which the current certificate is valid. The field Paid until will show the date April 02, 2031. — the expiration date of the paid period. Each year during this period, platform will automatically perform an action according to the settings:
- send a notification about the need for reissue;
- reissue the certificate for the next year.
If the certificate is purchased for one year, the field Paid until remains empty.
Setting up a reissue policy
You can configure the SSL certificate reissuance policy:
- via the platform interface. In the main menu, go to Products → Product types → SSL certificate → button Edit → block Subscription:
- Expired certificate processing policy — select one of the options:
- Automatic certificate reissue — default value;
- Certificate expiration notification — a notification is sent to the client about the expiration of the current certificate. To set the notification template, in the main menu go to the section Settings → Message templates;
- Period to start working with expiring certificate — specify how many days before the certificate expiration the policy should be triggered. Default value — 10, maximum value 200.
- Expired certificate processing policy — select one of the options:
- using the configuration file /usr/local/mgr5/etc/billmgr.conf. Use the options:
-
-
Option SSLSubscriptionPolicy— specify to configure the certificate processing policy within the subscription. Values:auto— certificate reissuance is triggered automatically. Default value;manual— a notification is sent to the client about the expiration of the current certificate. To set the notification template, in the main menu go to the section Settings → Message templates;none— no actions are performed;
Option SSLSubscriptionBefore— the value determines how many days before the certificate expiration the Option SSLSubscriptionPolicy policy should be triggered. Default value — 10, maximum value 200.
-
Selling certificates for a 199-day period
Within the framework of the rules limiting the maximum validity period of SSL certificates, you can offer clients certificates with the maximum validity period — 199 days.
To configure sales, activate the Half a year period in the platform settings and tariff plans:
-
Configure the product type:
- Go to the section Products → Product types → select the SSL certificate product type → Edit.
- In the Period section, select the Half a year option → click Ok.
-
To apply changes, restart the platform:
/usr/local/mgr5/sbin/mgrctl -m billmgr -R -
Configure the period in tariff plans:
- Go to the section Products → Tariff plans.
- Select the tariff → Edit.
- In the block Prices, specify the price for Half a year.
- Click Ok.
View SSL certificate information
- You can download the files containing the private key and the certificate request:
- Go to Products/Services → SSL Certificates.
- Select SSL сertificate in the table → View → Certificate files.