How do you migrate virtual machines from VMware ESXi to the VMmanager virtualization platform? In this article we will review the methods of migration, which are the most common on the Internet, and provide a sequence of specific migration steps for several typical scenarios, as well as show methods to configure I/O devices for QEMU-KVM.
Features of migration from VMware
For a better understanding of the next steps, we would like to begin this article with a description of some of the peculiarities of migration that we have to deal with.
For any virtual machine migration, the standard approach is to convert the disk from one format to another. VMware's disk format is .vmdk. For QEMU-KVM, which VMmanager uses, the disk format is .qcow2 or raw.
There is a utility, qemu-img, which is being developed by the QEMU project team. It is already installed on your system if you are using the QEMU-KVM-libvirt bundle. Qemu-img allows you to convert virtual machine disks between different formats. In particular, you can convert from .vmdk to .qcow2 or from .qcow2 to raw.
It may seem that it is sufficient to simply convert the disks and everything will work, but unfortunately things are a bit more complicated. This conversion for a virtual machine would be similar to the situation faced by a laptop operating system when you move a drive from one computer to another.
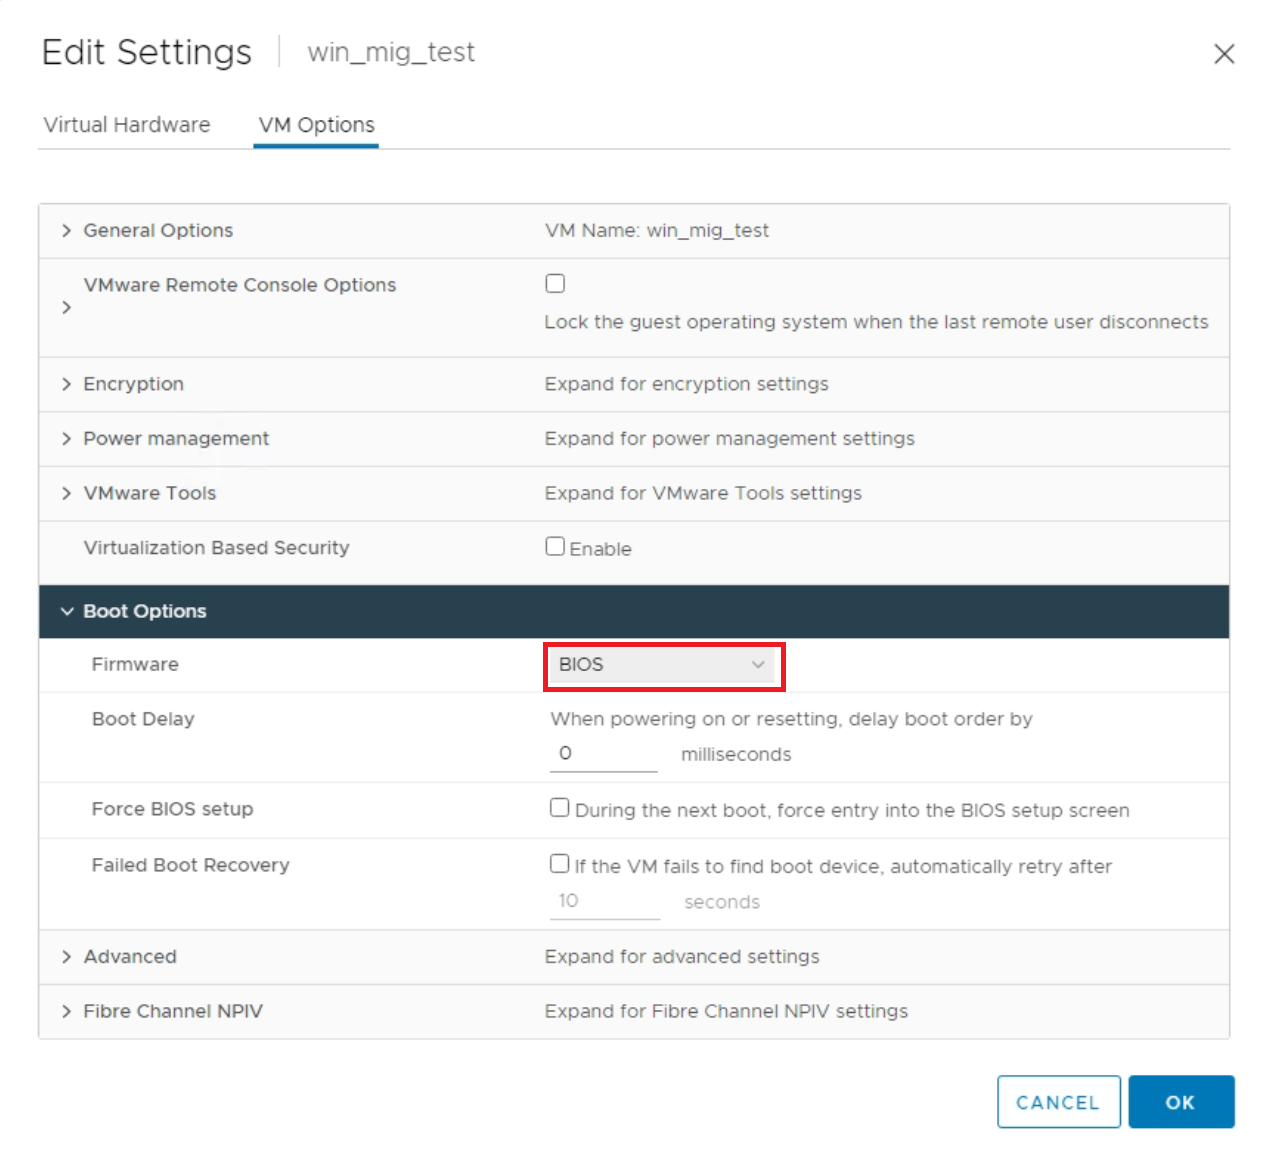
The first feature to consider is the type of loader used: BIOS or UEFI. It has one key requirement: the virtualization environment to which the migration is performed must use the same loader as the source virtualization environment.
On VMware, the loader type can be viewed in the virtual machine settings. The example below uses BIOS, but VMware's default setting is UEFI.
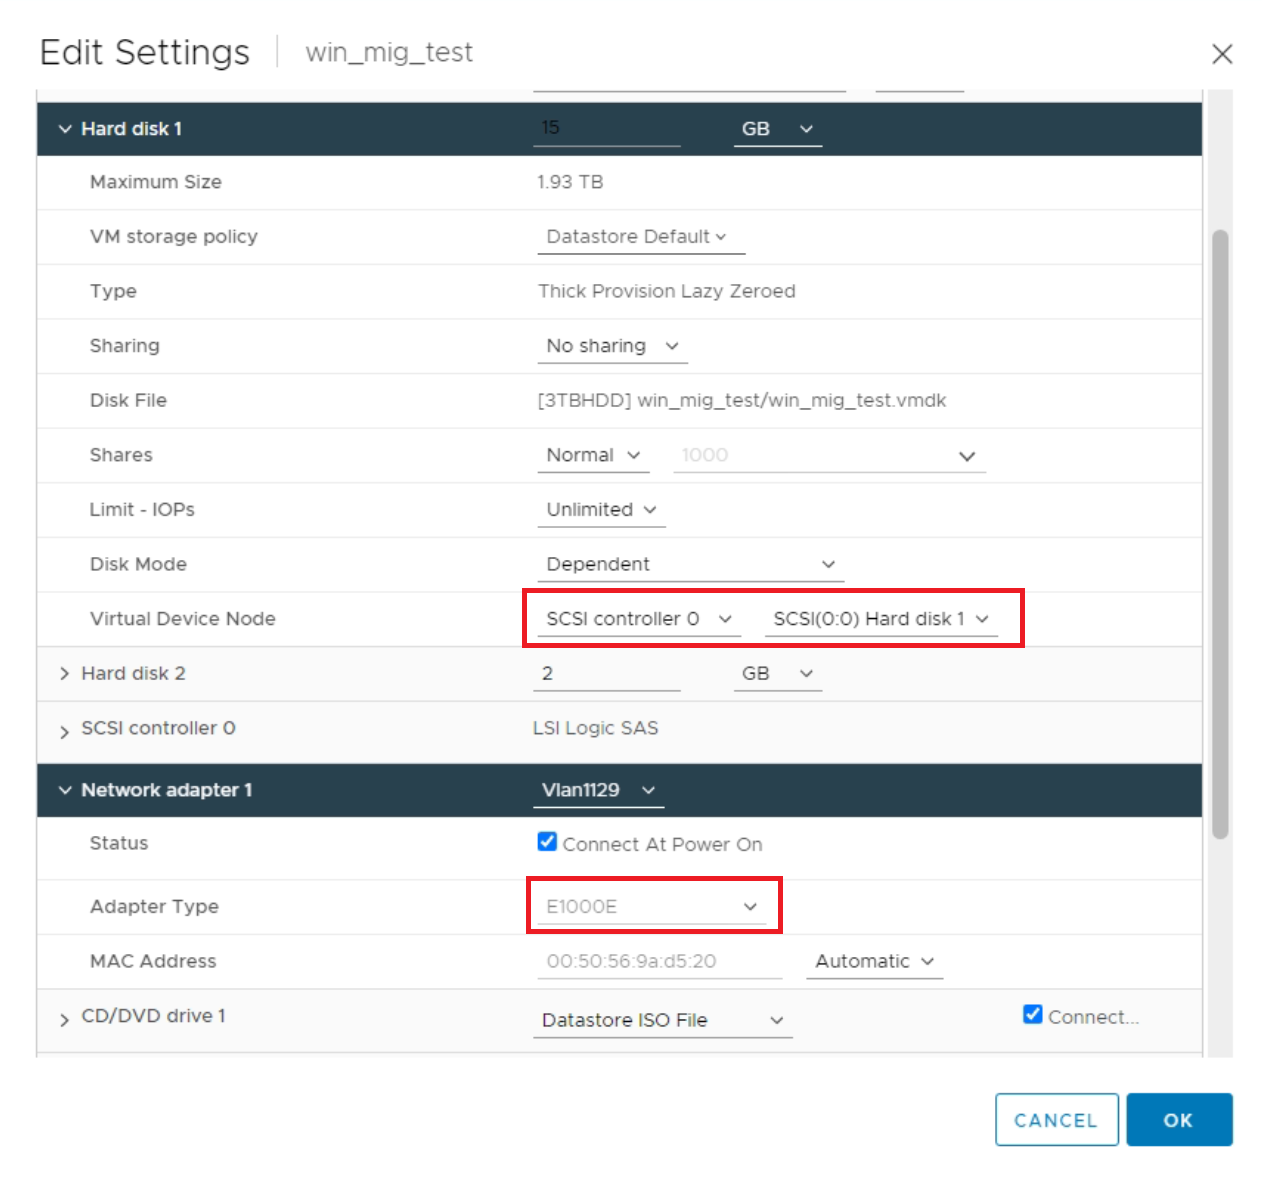
The second block of features are I/O devices and drivers to manage them. The source and target migration environments may have different devices.
For example, VMware usually uses SCSI for disks and E1000E for the network adapter, which emulates an Intel NIC. Information about the devices is also available in the virtual machine settings.
QEMU-KVM has a great device called virtio that can be used to connect disks, for network adapters and much more. Virtio does not emulate a physical device known to the operating system, such as the E1000 network card, but rather appears as a specialized virtual device. The advantage of virtio is higher performance compared to emulation.
Not all operating systems support virtio, but most current operating systems do. When migrating, it is recommended to migrate your virtual machines to work exactly with virtio in terms of network and disk subsystem. This will allow you to have high performance for the corresponding subsystems of the virtual machine.
Unfortunately, many operating systems running on VMware do not include virtio drivers "out of the box". This creates the second and most complex feature of migration.
Third, we would like to highlight the issue of the necessary infrastructure for migration. In general, the migration process involves copying a .vmdk disk, converting it, and adding it to a virtual machine in the new virtualization environment.
Each of these procedures requires disk capacity, network bandwidth, and computing resources. And if the disks of the virtual machine are large, you will need a lot of space. The required capacity can be estimated as x2 of the virtual machine's disk size. And you should not forget about the conversion time for large disks. It is not going to be small either. There is, of course, no chance of online migration. Any such migration will involve a virtual machine shutdown.
Approaches to migration
Taking into account the peculiarity indicated in the previous paragraph with I/O devices, we can distinguish two approaches:
- Migration with qemu-img and subsequent installation of drivers./li>
- Migration using the virt-v2v utility with automatic installation of drivers.
The outline of the first approach has already been outlined in the previous chapter. It can be summarized in the following plan of action:
- Copying and converting .vmdk disks to .qcow2 disks.
- Creating a virtual machine in VMmanager with disks of no smaller size.
- Copying the converted disks in place of the virtual machine disks.
- Adjusting the configuration xml-file of the virtual machine, changing the type of input/output devices.
- Installing the necessary drivers in the virtual machine.
- Adjusting the configuration xml-file to its original state.
But the virt-v2v utility is not mentioned above. Virt-v2v is a tool that RadHat is developing. The utility converts virtual machines to run on the QEMU-KVM hypervisor from virtual machines running on other hypervisors. You can read the for more details.
The key advantage of virt-v2v over qemu-img is that virt-v2v not only converts disks, but also adds the necessary drivers to the guest operating system and offers a configuration xml file for the virtual machine. The disadvantage is that the utility supports a limited set of operating systems, as well as, if used, it reduces the transparency of what happens during the conversion.
In this case, the plan may consist of the following steps:
- Copying and converting .vmdk disks to .qcow2 disk
- Creating a virtual machine in VMmanager with disks of no smaller size.
- Copying the converted disks in place of the virtual machine disks.
And if virt-v2v was able to install the virtio drivers, the virtual machine will start successfully.
Migration stand setup
Now we can go from general considerations about migration to specific steps.
First, a couple of words about the parameters of the stand and the versions of the software used:
- VMware ESXi 7.0.3, 20328353 running under vCenter Server 7.0.3.00700.
- VMmanager 11365 (11.3.5) platform server with added virtualization node based on Alma Linux 8.7, Qemu 6.2.0, and Libvirt 8.0.0.
The node was used as a conversion server.
Windows Server 2016 and Alma Linux 8.7 were used as guest operating systems for testing. The loader is BIOS, two disks are connected in each virtual machine, one network interface is added.
Migration with qemu-img
The first "default" step is to back up everything to be migrated. No matter how secure the operation, backups will safeguard against undetected risks.
The following are the steps of the migration process.
-
Check if VMware guest tools are installed and uninstall them if they are
Guest tools can prevent the virtual machine from running on the new hypervisor.
You can run the command rpm -qa | grep open-vm to check this on Alma Linux . If installed packages are found, it means there are tools and they need to be uninstalled.
Run the command "rpm -e
” to uninstall. In my case - "rpm -e open-vm-tools-12.0.5-2.el8.x86_64". You can read more about uninstalling the VMware tool on RedHat-like systems .
To uninstall guest tools on Windows, you can use the "Programs and Features" control panel item. There you can also check if guest tools are installed by looking at the list of installed programs.
- Transfer virtual machine files from VMware to the server where the migration will take place
For the qemu-img tool, the .vmdk files will be sufficient, but for the virt-v2v tool, the .vmx configuration files are also required.
In the example, the entire folder with the virtual machine files will be copied. Note that the file
.vmdk usually contains configuration information (you can view it as a plain text file with the command: cat ). The file with the disk itself has the suffix flat in its name. For example, my disk file is called: migration_test-flat.vmdk. The scp tool is suitable for copying. The command copying from ESXi has the format as follows:
scp -r root@<esxi ip-address>:/vmfs/volumes/<datastore name>/<VM directory name>/ <target directory>In my case:
scp -r root@172.31.4.204:/vmfs/volumes/5e53a708/migration_test/ /migration
- You can convert the .vmdk disk to .qcow2 format with qemu-img
General format of the command:
qemu-img convert -p -O qcow2 <path to .vmdk> <name of the qcow2 disk to be created>If the virtual machine has several disks, you should convert each of them. In my case, the commands looked as follows.
qemu-img convert -p -O qcow2 ./migration_test-flat.vmdk ./migration_test-flat.qcow2qemu-img convert -p -O qcow2 ./migration_test_1-flat.vmdk ./migration_test_1-flat.qcow2
- Create a virtual machine in the VMmanager interface
When creating a virtual machine, you should specify the same number of disks as the original virtual machine had. Select a disc size no smaller than the original disc size.
- Move the converted disks to replace the created disks of the virtual machine
Replace the virtual machine disks with converted .qcow2 disks. By default, virtual machine disks in VMmanager are located on nodes in the /vm directory and are identified by the name of the virtual machine. When moving the converted disk, the original name of the created disk of the virtual machine must be preserved.
You can use the xml configuration of the virtual machine to avoid mixing up the disks, as well as to identify the disk name and the directory where the disk is located. The configuration is available on the node with the virtual machine using the command:
virsh dumpxml <virtual machine name>
- Adjust the I/O settings in the virtual machine configuration
If you run virtual machines at this point, you may encounter a problem while booting. Alma Linux boots in emergency mode, while Windows also boots in recovery mode.
 Linux Emergency mode
 html
Windows recovery mode
html
Windows recovery modeThe reason for this behavior is the lack of virtio drivers.
To still be able to boot the guest operating system, you need to adjust the xml-configuration by changing the type of devices used for disks and interfaces. You can use the command to accomplish this:
virsh edit <VM name>The auto-generated configuration of the disk subsystem and network interfaces in my example looks like this:
<disk type='file' device='disk'>
    <driver name='qemu' type='qcow2'/>
    <source file='/vm/7_Mig_test_alma_qemuimg'/>
    <target dev='vda' bus='virtio'/>
    <boot order='1'/>
    <address type='pci' domain='0x0000' bus='0x00' slot='0x07' function='0x0'/>
</disk>
<disk type='file' device='disk'>
    <driver name='qemu' type='qcow2'/>
    <source file='/vm/8_Mig_test_alma_qemuimg_2'/>
    <target dev='vdb' bus='virtio'/>
    <boot order='2'/>
    <address type='pci' domain='0x0000' bus='0x00' slot='0x08' function='0x0'/>
</disk>
<interface type='bridge'>
    <mac address='52:54:00:56:30:d8'/>
    <source bridge='VLAN1129'/>
    <target dev='vm9_net0'/>
    <model type='virtio'/>
    <address type='pci' domain='0x0000' bus='0x00' slot='0x03' function='0x0'/>
</interface>
As you can see from the configurations, the virtio device type is used everywhere.
You can change these devices to boot the operating system. Select an IDE device for the disk subsystem and an E1000 adapter for the network. Do not forget to save the original configuration, it is still useful.
As it turned out further, the virtio drivers for Alma Linux are contained in the operating system, but are not included in initramfs, so changing the devices for the disk system is sufficient to run Alma Linux. For Windows, on the other hand, both the disk system and the network device must be replaced.
The adjusted blocks of the configuration file in my example are as follows:
<disk type='file' device='disk'>
    <driver name='qemu' type='qcow2'/>
    <source file='/vm/7_Mig_test_alma_qemuimg'/>
    <target dev='sda' bus='ide'/>
    <boot order='1'/>
    </disk>
<disk type='file' device='disk'>
    <driver name='qemu' type='qcow2'/>
    <source file='/vm/8_Mig_test_alma_qemuimg_2'/>
    <target dev='sdb' bus='ide'/>
    <boot order='2'/>
</disk>
<interface type='bridge'>
    <mac address='52:54:00:56:30:d8'/>
    <source bridge='VLAN1129'/>
    <target dev='vm9_net0'/>
    <model type='e1000'/>
    <address type='pci' domain='0x0000' bus='0x00' slot='0x03' function='0x0'/>
</interface>
You can also change the disk settings in the VMmanager settings in the web interface. This is available in the virtual machine settings Virtual disks → Edit disk → Connection type.
- Start virtual machines in the VMmanager interface
The settings made allow you to start the virtual machines and boot the operating system.
- Adjust network interface settings
Please note that after booting, the new network devices will be presented to the operating system as new interfaces and will need to be reconfigured.
- Install the necessary drivers for the operating systems
The next step is to install the virtio drivers. For WIndows, you can do this by downloading the current drivers from and making settings in the operating system.
For Alma Linux, as mentioned above, the situation is more interesting because the drivers are actually contained in the operating system, but not in initramfs, which is loaded before the kernel starts. This can be seen by running the command:
lsinitrd /boot/initramfs-4.18.0-425.3.1.el8.x86_64.img | grep virtioIf its output is empty, it means there are no drivers in initramfs..
You can check if the virtio drivers are available on your system with the command:
find /lib/modules/$(uname -r)/kernel/drivers/ -iname "virtioThus, Alma Linux does not require drivers to be installed: just add the necessary drivers to initramfs. The procedure is described in the corresponding on the RedHat website.
It all comes down to creating a /etc/dracut.conf.d/virtio.conf file with the contents:
add_drivers+=" virtio_scsi virtio_blk virtio_net "- and then running the initramfs build with the dracut -f command.
- Restore the xml configuration of the virtual machine to its original state
After these manipulations, you can stop the virtual machines and restore the original xml configuration in terms of I/O devices.
With the changes made, the virtual machines should successfully boot with the virtio I/O devices.
- Install new guest tools
At the end of the migration procedure you need to install the guest tools to work with QEMU-KVM, that is to install QEMU Guest agent. You can easily find instructions on the Internet or use the built-in VMmanager guest agent installation functionality.
Migration with virt-v2v
The previous method looks cumbersome, but it gives an idea of what is going on in the migration process. A more convenient way to achieve a similar result is to convert using the virt-v2v utility. The operations that were performed manually in the previous paragraph are taken over by the utility.
Important materials on the operation of the utility:
- of the utility and supported operating systems.
- about the utility itself.
- about the utility in the context of migration from VMware.
But before you can use the utility, it must be installed:
dnf install virt-v2v
- Getting ready to use the utility
The first step is to perform preparatory tasks. Same as in the previous section, uninstall VMware guest tools and load virtual machine files on the conversion server.
The virt-v2v utility allows you to connect to a vCenter Server and automatically download virtual machine files during the conversion process, but for the purposes of this article, the files will be downloaded locally.
In the case of Windows conversion, you must check whether the virtual machine performing the conversion has the virtio drivers for the Windows system. To do this, you can check whether the virtio-win directory is available at the path: /usr/share/virtio-win. If the virtio-win directory is missing, there are no drivers and you need to download them.
The process is described in detail in the . The easiest of the options is to add a and run the dnf install virtio-win command.
- Perform virtual machine conversion
To convert, run the virt-v2v utility, specifying the path to the virtual machine's .vmx file. Note that the path to the .vmx file is specified, not to the .vmdk files. The rest of the virtual machine files must be in the same directory as the vmx file.
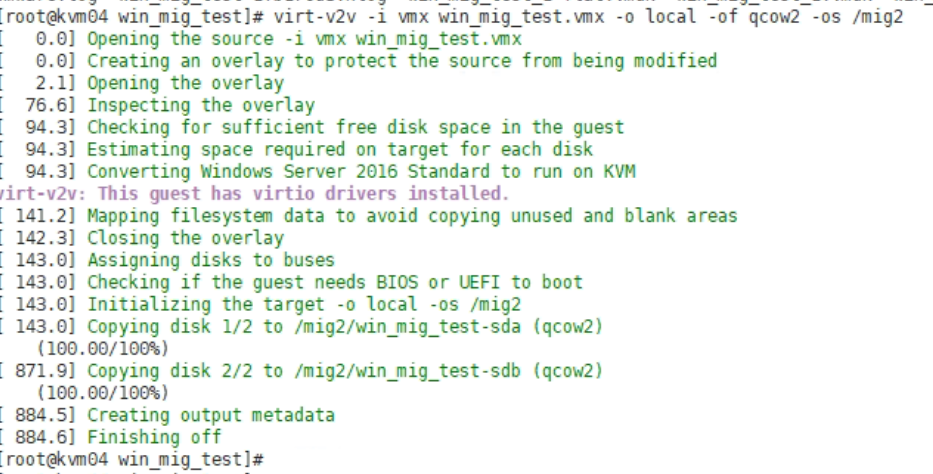
virt-v2v -i <path to .vmx file> -o local -of qcow2 -os <directory with files after conversion>In my case, the team looked like this:
virt-v2v -i vmx ./win_mig_test.vmx -o local -of qcow2 -os /migThe result of virt-v2v is displayed in the console:
During conversion, errors of access permissions to the .vmdk file can occur. The command to change the ownership of the .vmdk files to qemu was used to fix them:
chown qemu:qemu <path to .vmdk files>
- Create a virtual machine and replace the disk files of the virtual machine
Repeat steps 4 and 5 from the previous section. After that the virtual machine can be started. In our lab, virtual machines with Windows 2016 and Alma Linux 8.7 started successfully.
After starting the virtual machine you will need to reconfigure network interfaces, and do not forget to install the guest tools QEMU Guest agent.
As part of our lab for Windows 2016, the second drive ended up offline, which is also easy to fix in the Disk Management menu.
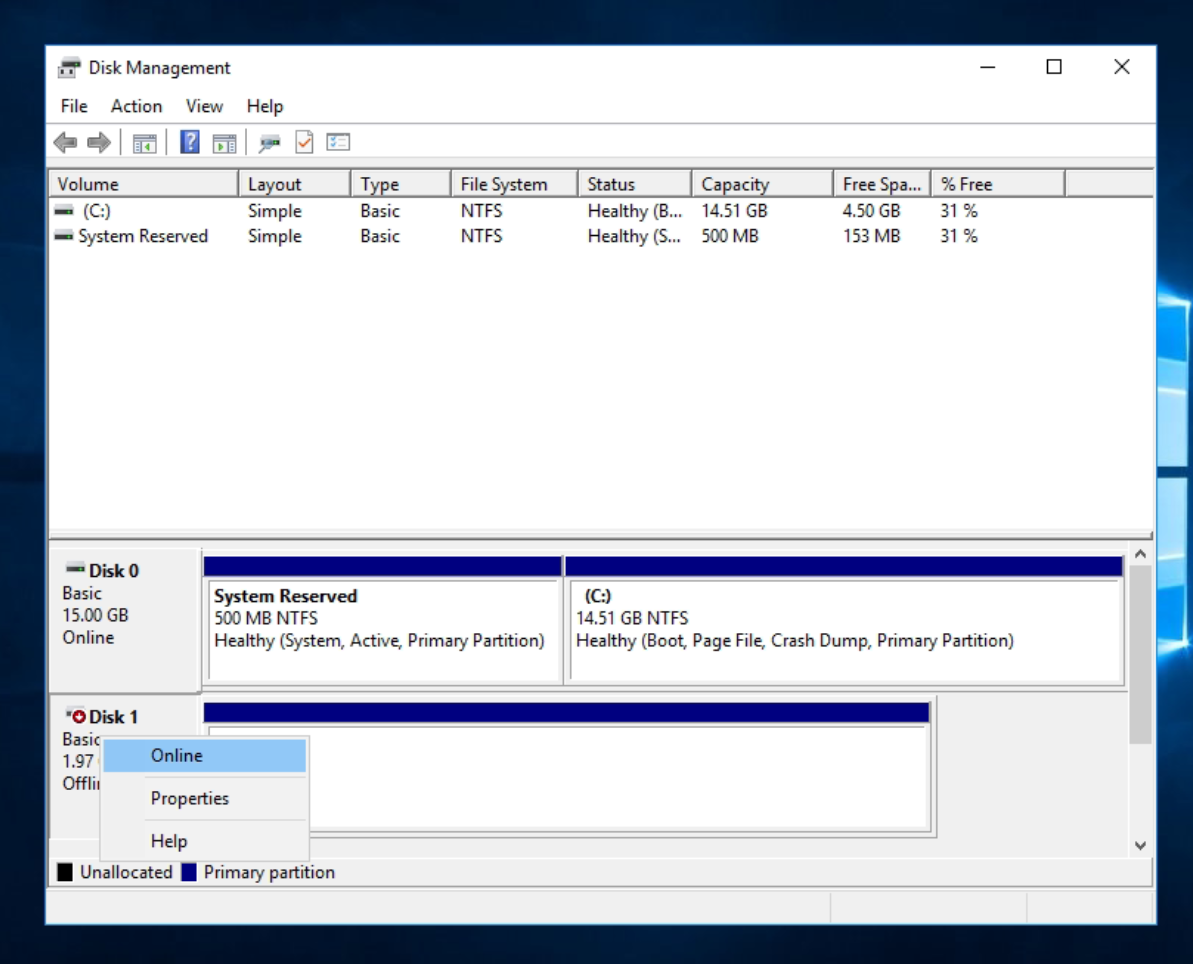 Windows Disk Management
Conclusion
From the above, we can conclude that migrating virtual machines is a project task that requires a project-based approach. A "quick migration" will probably not work or may cause problems in the future.
For a successful migration, you need to determine how to migrate each virtual machine and test specific versions of operating systems and drivers. The good news is that in most cases the problems can be overcome and migration performed.
Try VMmanager


