 En
En
 Es
Es
You can create a backup copy of VMmanager that contains all the settings of the platform. The backup copy is saved in .tar archive format and contains the following files:
- config.json — platform configuration file;
- docker-compose.yaml — Docker configuration file;
- vm_dump.sql — platform database dump file.
Copy names have the format YYYY_MM_DD__HH_MM.tar.gz.
You configure scheduled creation of platform backups and exporting them to an external storage. A physical or virtual server with access via SSH or FTP (FTPS) can be used as a storage. In addition, the five latest backups of the platform are saved on the server with VMmanager in the /opt/ispsystem/vm/backup/ directory.
Backup creation and restoring from backup are performed by the vm platform installation service. If VMmanager is not installed or damaged on the server to be recovered, the service will install the platform and then restore data from the backup.
Determining required disk space
When creating a backup, its data is stored in the /tmp directory on the server with the platform. Make sure that there is enough free space in the partition with this directory. If there is not enough space, the backup will not be created.
The main part of the backup is the database dump. To find out its size:
- Connect to the server with the platform via SSH.
- Run the command: MySQL
sudo docker exec -it mysql bash -c "mysqldump --all-databases --single-transaction --extended-insert -p\$MYSQL_ROOT_PASSWORD --log-error=/dev/null > /tmp/platform_dump.sql" && sudo docker exec -it mysql du -h /tmp/platform_dump.sql && sudo docker exec -it mysql rm -f /tmp/platform_dump.sqlPostgreSQLsudo docker exec -it pgsql bash -c "pg_dump isp > /tmp/platform_dump.sql" && sudo docker exec -it pgsql du -h /tmp/platform_dump.sql && sudo docker exec -it pgsql rm -f /tmp/platform_dump.sql
Creating backups
In the console
-
Connect to VMmanager server via SSH and enter the command:
vm backup - Enter the password for the backup archive or press Enter to create an archive without a password.
The copy will be saved to /opt/ispsystem/vm/backup/.
In the platform interface
Configure the platform backup creation schedule to create copies automatically. Enter  → Database backup → Add schedule:
- Select when to Make copies:
- Daily;
- Weekly → select the day;
- Monthly → enter the date from 1 to 28 → Apply;
- enter the time in the cron scheduler format. For example, 15 10 * * 0 — create backups on Sundays at 10:15 UTC or 00 12 1,16 * * — create backups on the 1st and 16th of the month at 12:00 UTC.
- Enter the UTC time at which platform will start backup creation.
- Specify the schedule Name. By default, platform creates a schedule with the name corresponding to the schedule settings. For example, "Daily at 0:00 through SSH".
- Specify the discretionary Note to the schedule.
- Select the storage for backups:
- external storage with connection through SSH;
- external storage with connection through FTP;
-
external storage with connection through FTPS;NotePlatform will not be able to save a backup if the FTP (FTPS) server has an invalid SSL certificate. -
Locally — the backup will be created at the server with platform.
NoteWe recommend saving backups to an external storage, because in case of problems with the platform server, the backup files may be damaged.
-
If you use an external storage, specify its settings:
- IP address or domain name;
- Port;
- Login;
- Password or press I want to use public SSH-key to configure an SSH key connection;
- Storage path — the directory on the server to which platform will save backups.
- Press Add.

You can manage the created schedules through the  menu in Settings → Database backup. Possible actions with schedule:
- Run the schedule — start backup creation process immediately;
- Edit — change the schedule; If you change the schedule, you need to re-enter the password to the FTP (FTPS) or SSH server.
- Enable/Disable;
- Note — add note;
- Delete.
Also in this section you can download the last five backups.
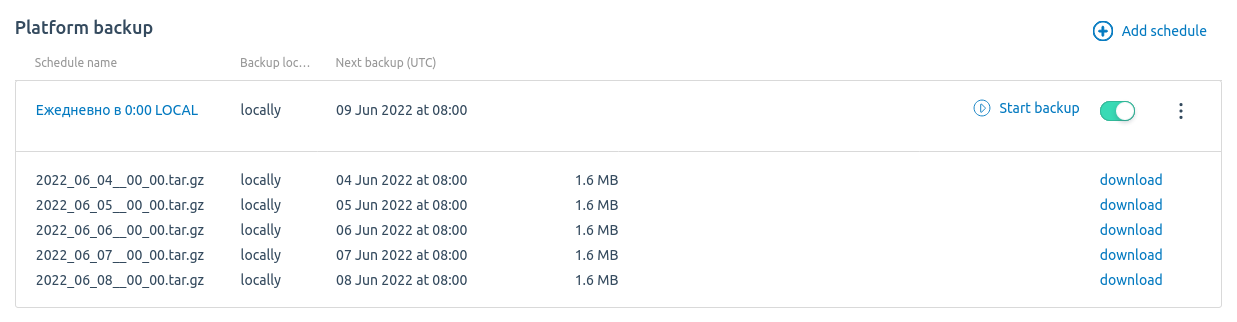
Database backup section
Recovery from a backup
If VMmanager is not installed on the server
- Generate a new token in your client area eu.ispsystem.com.
- Connect to the server via SSH.
- Update the minor version of the operating system to the latest stable one.
- If tar archiver or curl utility are not installed on the system, install them.
-
Download the installer:
curl -O https://download.ispsystem.com/6/installer/vm/vm -
Make the installer file executable:
chmod +x vm -
Start the recovery:
./vm restore -i -b=<backup_file>Comments to the command - If necessary, enter the backup archive password.
- If the server's domain name has changed:
- Specify the new domain name in the DomainName parameter of the /opt/ispsystem/vm/config.json file.
- Restart the platform:
vm stop && vm start
-
Activate the license:
-
In VMmanager interface, go to
 → System overview.
 - In the License key field enter the value of the license token.
- Click the Activate button.
-
If VMmanager is installed on the server
- Generate a new token in your client area eu.ispsystem.com.
- Connect to the server via SSH.
- Update the minor version of the operating system to the latest stable one.
- If the tar archiver is not installed on the system, install it.
-
Start the recovery:
vm restore -b=<backup_file>Comments to the command - If necessary, enter the backup archive password.
-
Go to the directory with the license files:
cd /opt/ispsystem/license -
Delete all files from the directory except machine_id:
rm -v !("machine_id") - If the server's domain name has changed:
- Specify the new domain name in the DomainName parameter of the /opt/ispsystem/vm/config.json file.
- Restart the platform:
vm stop && vm start
-
Activate the license:
-
In VMmanager interface, go to
→ System overview. - In the License key field enter the value of the license token.
- Click the Activate button.
-
Possible issues
In some cases, you may need an older version of the platform installation service to restore from a backup. For example, if the structure of Docker containers has changed in the current version of the platform. To download an older version of the service:
- Determine the service version based on the platform version: For Stable version
curl https://download.ispsystem.com/6/vm/stable/vm/stable.json | jq -r '[.Releases[] | select(.Version == "<version>") | "InstallerVersion = \(.Require.InstallerVersion)"] | .[0] // "Not found"'Comments to the commands:For Regular versioncurl https://download.ispsystem.com/6/vm/beta.json | jq -r '[.Releases[] | select(.Version == "<version>") | "InstallerVersion = \(.Require.InstallerVersion)"] | .[0] // "Not found"'<version>— platform version in the backup. For example,2026.01.1or2025.08.2-1
- Save the value InstallerVersion in the command output: Example output
% Total % Received % Xferd Average Speed Time Time Time Current Dload Upload Total Spent Left Speed 100 3329 100 3329 0 0 23609 0 --:--:-- --:--:-- --:--:-- 23609 InstallerVersion = 5.6.19 - Execute the command: Comments to the command:
curl -O https://download.ispsystem.com/6/installer/vm/<installer_version>/vm<installer_version>— version of the platform installer. For example,5.6.19