 En
En
 Es
Es
When a virtual machine (VM) is created, VMmanager allocates to it an IP address from a specified pool. You can assign additional IP addresses to VMs or delete existing ones. To manage IP addresses, enter Virtual machines → select VM → Parameters button → IP addresses.
Recommendations
You can configure IP addresses to be checked before the platform allocates them to virtual machines (VMs). If the IP address fails verification, VMmanager will not assign it to the VM. For example, you can prevent the issuance of IP addresses assigned to any devices on the network. For more information, see knowledge base article How to set up an IP check before allocation?
To ensure that the network on the VM works correctly, do not use the same subnet for the VM as for the cluster node. If this is not possible, use the IP address of the cluster node as the gateway for the VM.
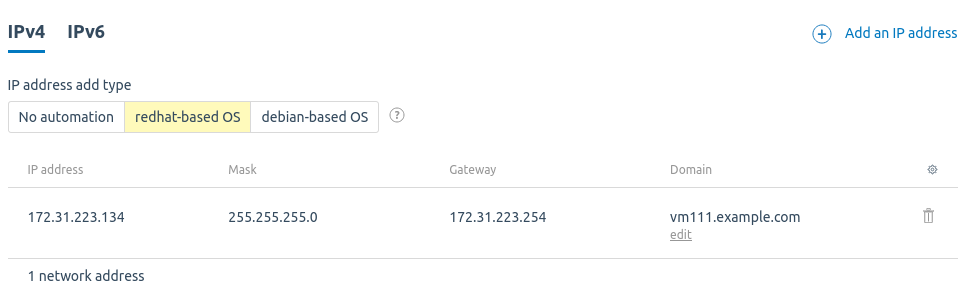
Managing IPv4 addresses
You can choose the type for adding an IPv4 address to a VM. The file to which the network configuration will be written depends on the selected type:
Changing the model may fail with error 5991 "Ip automation not available" if:
- the VM settings in the platform include a network interface that does not actually exist on the VM;
- the VM settings in the platform include IP addresses that do not actually exist on the VM;
- the VM was imported from VMmanager 5 and automatic synchronization of network interfaces has not been completed.
To add IPv4 addresses:
- If necessary, change the IP address add type. By default, VMmanager automatically selects the type that corresponds to the operating system.
- Click Add an IP address button.
- Select a Network type:
- Main;
- Additional — available for clusters with two network interfaces. Read more in Main and additional network;
- Virtual — if a virtual network is available in the cluster. Read more in Virtual networks (VXLAN).
- For main and additional networks:
- Select how to Add IP address or subnet:
- From pool IPv4:
- Select an IP address pool from which to assign addresses to the VM.
- Select or enter the desired Number of IP addresses. A maximum of 10 IP addresses can be issued to a VM;
- Manually:
- Enter the IPv4 address or IPv6 subnet from the pool used in the cluster. For an IPv4 address, use the format
x.x.x.x.x, for an IPv6 subnet, use the formatx:x:x:x:x:x:x:x:x:x:x/yy, where /yy is the subnet prefix from /32 to /125. The address or subnet will not be added if they do not belong to the pool used in the cluster;
- Enter the IPv4 address or IPv6 subnet from the pool used in the cluster. For an IPv4 address, use the format
- Subnet:
- Select a Physical network from which the subnet will be allocated.
- Select a Subnet prefix.
- From pool IPv4:
- Select how to Add IP address or subnet:
- For virtual network:
- Select a VxLAN.
- Select a LAN.
- Select or enter the desired Number of IP addresses. A maximum of 10 IP addresses can be issued to a VM.
- Click Add button.
Additional IPv4 addresses will be added to the network configuration of the VM with the /32 prefix.
To delete an IP address, click ![]() → Delete.
→ Delete.
IPv4 tab
Managing IPv6 addresses
To add an IPv6 address:
- Go to the IPv6 tab.
- Click Enable IPv6.
- Select IPv6 pool.
-
Select Subnet prefix from /48 to /125.
The subnet prefix must be greater than the network prefix. - Click Enable IPv6.
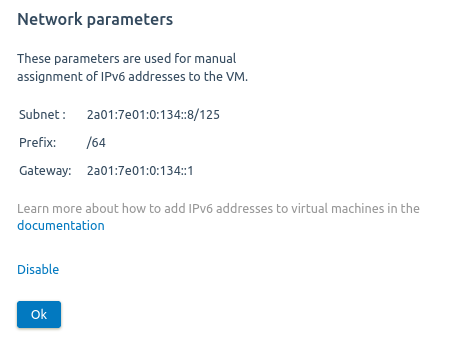
The platform will allocate a subnet of IPv6 addresses for the VM. The first address from the subnet will be automatically assigned to the VM interface. Network settings will need to be added to the VM manually. Read more in Assigning IP addresses with OS tools.
To disable IPv6 addressing, press Network parameters → Disable → Disable IPv6.
Read more about IPv6 in Managing IPv6.
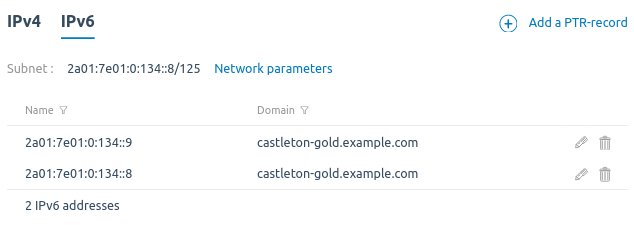
PTR records for IPv6 addresses
PTR records are needed so that the DNS server can determine the domain name of a VM by its IP address. These records are used for some Internet services (e.g., sending email).
The main VM domain is automatically linked to the first two IPv6 addresses from the allocated subnet. For example, subnet 2a01:230:2:3::8/125 is allocated to cosmos-diamond.example.com VM. The platform will automatically create PTR records linking the domain cosmos-diamond.example.com to the IP addresses 2a01:230:2:3::8 and 2a01:230:2:3::9.
To manage PTR records:
- Configure integration with DNSmanager 6. Read more in the Integration with DNSmanager 6 module.
- Go to Virtual machines → select the VM → Parameters button → IP addresses tab → IPv6 tab.
To create an additional PTR record for a VM:
- Click Add a PTR-record.
- Enter the IPv6 address and the Domain it should correspond to.
- Click Add.
To change the record settings, click  .
.
To delete the record, click ![]() .
.
Configuring PTR records
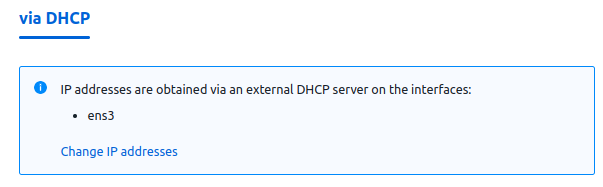
Allocating IP addresses via DHCP
If the VM's IP address was assigned by an external DHCP server, the platform will not consider this address, manage it and display it in the interface. You can modify the VM's network settings only in the guest OS.
To disable address allocation via DHCP:
- Click the Change IP addresses link.
- Select how to Add IP address or subnet:
- From pool IPv4:
- Select an IP address pool from which to assign addresses to the VM.
- Select or enter the desired Number of IP addresses. A maximum of 10 IP addresses can be issued to a VM;
- From pool IPv6:
- Select an IP address pool from which to assign addresses to the VM.
- Enter the Subnet prefix from /32 to /125;
- Manually:
- Enter the IPv4 address or IPv6 subnet from the pool used in the cluster. For an IPv4 address, use the format
x.x.x.x.x, for an IPv6 subnet, use the formatx:x:x:x:x:x:x:x:x:x:x/yy, where /yy is the subnet prefix from /32 to /125. The address or subnet will not be added if they do not belong to the pool used in the cluster;
- Enter the IPv4 address or IPv6 subnet from the pool used in the cluster. For an IPv4 address, use the format
- Subnet:
- Select a Physical network from which the subnet will be allocated.
- Select a Subnet prefix.
- From pool IPv4:
- Click the Apply button.

Allocating an IP address in a cluster with the Routing type
In a cluster with the Routing network settings type, a range of IP addresses is allocated for VMs. When a VM is created, the first free address from the range is assigned to it.
You can assign a VM a specific IP address from the range through API request. To do this:
- Get the authorization token:
curl -k -X POST -H "accept: application/json" -H "Content-Type: application/json" 'https://domain.com/auth/v4/public/token' -d '{"email": "admin_email", "password": "admin_pass"}'Comments to the commandIn response, you will get the message in the form:
Example of response in JSON{ "confirmed": true, "expires_at": null, "id": "6", "token": "4-e9726dd9-61d9-2940-add3-914851d2cb8a" }Save the received token value.
- Execute the POST request:
curl --insecure -H 'x-xsrf-token: <token>' -X POST https://example.com/vm/v3/host/<VM_id>/ip -H 'accept: application/json' -H 'Content-Type: application/json' -d '{"interfaces": [{"cluster_interface":<interface_id>, "ip_name":"<ip>"}]}'Comments to the command