En
En
 Es
Es
vGPU (virtual graphics processing unit) is a software emulation of a physical GPU (graphics processing unit). vGPU allows you to distribute graphics processor and graphics card memory resources among several virtual machines (VMs). VMs take turns using the GPU power and allocate a part of video memory for their needs. When a VM is shut down or suspended, vGPU resources are released. For more information about the technology, read the Nvidia documentation.
vGPU technology in VMmanager allows:
- users to create VMs with GPUs to accelerate graphics computing (for example, for applications in virtual desktops);
- administrators to allocate resources of a single GPU device among multiple VMs.
If there are multiple GPU devices installed on a cluster node, some of them can be used for GPU passthrough and the rest can be used to create vGPU-enabled VMs.
GPU resources are allocated between VMs using special configurations — vGPU profiles. Profiles allow you to allocate a certain amount of resources to each VM.
Feature limitations
vGPU is a proprietary technology from Nvidia. To use vGPU technology without restrictions, a vGPU license must be installed on the VM. If no license is installed, the Nvidia driver will limit GPU resource allocation and reduce the frame rate to 3 fps.
vGPU technology is only supported for certain Nvidia GPU devices. For a list of supported devices, see the Nvidia documentation.
vGPU and the following platform features are not supported to work together:
- enable high availability in the cluster if a VM with vGPU is on the list of VMs to recover;
- enabling the balancer in the cluster;
- evacuation of VMs with vGPU in cluster node maintenance mode;
To switch a node that has a VM with a vGPU to maintenance mode, you can:
- not to evacuate these VMs;
- disable vGPU on these VMs.
- VM snapshot creation;
- VM migration.
Supported drivers
Driver support depends on the operating system (OS) on the cluster node:
Preparation
BIOS configuration
For correct vGPU operation, enable IOMMU (Input/Output Memory Management Unit) and SR-IOV (Single Root I/O Virtualization) support in the BIOS settings on the cluster nodes.
Checking devices
Make sure that GPU devices are correctly detected by the system before configuring the passthrough:
- Connect to the cluster node via SSH. For more information about connecting via SSH, see Workstation setup.
- Run the command:
lspci | grep -iE "vga|3d" - Examine the command output. Example output
00:02.0 VGA compatible controller: Intel Corporation UHD Graphics 630 (rev 0c) 01:00.0 VGA compatible controller: Advanced Micro Devices, Inc. [AMD/ATI] Ellesmere [Radeon RX 470/480] 02:00.0 VGA compatible controller: NVIDIA Corporation TU106 [GeForce RTX 2060 SUPER] (rev a1) - If the command output does not contain device information, make sure that:
- The device is properly installed in the server.
- The device is active in the BIOS (UEFI) of the server.
Configuring IOMMU
IOMMU (Input/Output Memory Management Unit) is a memory management technology for I/O devices. IOMMU provides virtualization of physical memory addresses used by PCI devices and isolates resources between guest operating systems.
For correct device passthrough, enable IOMMU in the GRUB bootloader settings:
- Connect to the cluster node via SSH. For more information about connecting via SSH, see Workstation setup.
- In the /etc/default/grub file, add the IOMMU parameters to the end of the GRUB_CMDLINE_LINUX_DEFAULT variable. The parameter names depend on the type of processor installed in the server:
- Intel —
iommu=on,intel_iommu=on;Example variableGRUB_CMDLINE_LINUX_DEFAULT="quiet splash iommu=on intel_iommu=on" - AMD —
iommu=on,amd_iommu=on;Example variableGRUB_CMDLINE_LINUX_DEFAULT="quiet splash iommu=on amd_iommu=on"
- Intel —
- Update the GRUB configuration: AlmaLinux
sudo grub2-mkconfig -o /boot/grub2/grub.cfgUbuntusudo update-grub - Reboot the server:
sudo reboot
Reconnecting a node
If you are reconnecting a cluster node on which GPU passthrough or vGPU has already been configured, reboot the node server before connecting.
Installing the Nvidia driver
Install the Nvidia driver for vGPUs on the cluster nodes following the instructions in the official documentation.
Installing mdevctl
Install mdevctl, the vGPU management utility, on the cluster nodes:
sudo dnf -y install mdevctlsudo apt -y install mdevctlvGPU management
Info about GPU devices in cluster
To get information about the GPU devices in a cluster, go to Clusters → select the cluster → Parameters button → GPU devices tab.

Device selection
To select the devices for which the vGPU will be used:
- Go to Nodes → select a node → Parameters button → GPU devices section → GPU devices tab.
- For each device, in the Using column, click the
 icon → select vGPU. If IOMMU is disabled in the GRUB boot loader, the platform will prompt you to enable IOMMU and restart the server.
 - If any devices on the node have previously been used for GPU passthrough, reboot the cluster node.
To disable vGPU usage for a device:
- Disable vGPU in the fine-tuning settings of VMs that use this device.
- Go to Nodes → select a node → Parameters button → GPU devices section → GPU devices tab.
- In the Using column, click the icon → select Not used. These actions will remove the vGPU profiles from the platform and VM configurations.

Profile information
To view the vGPU profiles, go to Nodes → select a node → Parameters button → GPU devices section → vGPU profiles tab. When vGPU mode is enabled, a list of profiles appears on the tab.
To update the profile information, click the Update profile list button.
The profile table contains the following information:
- GPU device name;
- device number;
- profile name;
- number of displays;
- frame rate;
- frame buffer;
- maximum resolution;
- number of VMs using the profile.

Configuring vGPU on VMs
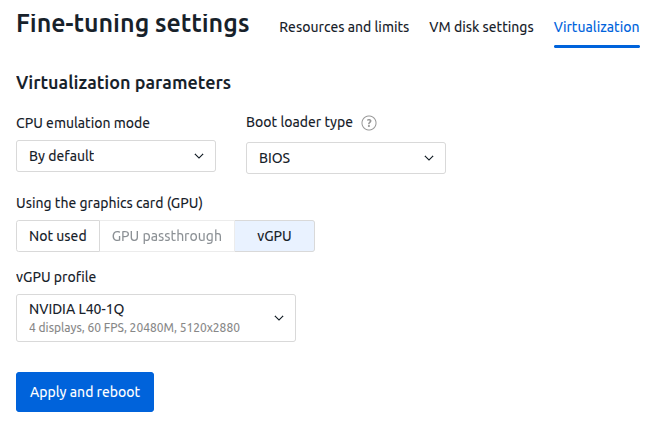
To enable VMs to use vGPU, when creating the configuration in the Virtualization parameters section:
- In the Using the graphics card (GPU) parameter, select vGPU.
- Select a vGPU profile from the list. The list displays all device profiles, including those that are temporarily unavailable.
You can change these settings in the VM's fine-tuning settings. If you change the parameters, the VM will be rebooted. During the VM reboot period, the parameter change will not be available.