 En
En
 Es
Es
You can configure user authorization on the platform via SSO. The platform supports SSO solutions that operate using the OIDC protocol, such as Keycloak or AD FS.
The platform only supports authorization through a single SSO server.
Work logic
If the SSO authorization is configured in the platform, the Login via SSO button appears on the platform login page. To log in via SSO, the user needs:
- Click the Login via SSO button. The SSO server authorization page opens in the browser tab.
- Enter their SSO login details. The platform interface opens in the browser tab.
In the SSO server connection settings, you can enable the User management option and specify which OIDC roles correspond to which user roles and groups. In this case, if a user logs in via SSO, their roles and groups will be set according to the specified settings. If there is no account with this email address on the platform, it will be created. If the OIDC role for the user is not specified in the settings, authorization will not be performed.
For accounts created during authorization via SSO, the user table indicates the source — OIDC. If you remove the connection to the SSO server, users with the OIDC source will be blocked. If the connection is restored, the blocking of these users will be removed.
Limitations
Combining SSO and LDAP
If you plan to use synchronization with the LDAP directory and authorization via SSO, then for the platform to work correctly:
- First, configure synchronization with the LDAP directory, and then authorization via SSO.
- To avoid conflicts in the operation of LDAP and SSO, do not use the User management option in the SSO connection settings.
Configuration on SSO side
Keycloak
Save the SSO configuration URL:
- Go to the section Realm settings.
- In the Endpoints parameter, copy the OpenID Endpoint Configuration link. The link usually looks like
https://example.com/realms/your_realm_name/.well-known/openid-configuration, whereexample.comis the domain name or IP address of the SSO server, andyour_realm_nameis the name of the Realm. You will need to specify this value in the platform when connecting SSO authorization in the SSO configuration URL field.
Create a new client for the connection:
- Go to the section Clients → Create client button.
- At the General settings step:
- In the Client type field, select: OpenID Connect.
- In the Client ID field, select the unique client id. You will need to specify this value in the platform when connecting SSO authorization in the Client ID field.
- In the Name field, specify the arbitrary client name.
- Click Next button.
- At the Capability config step:
- Enable the Client authentication option.
- In the Authentication flow parameter, leave the Standard flow option enabled — standard OIDC authentication.
- Leave the PKCE Method parameter blank — PKCE is not used.
- Click Next button.
- At the Login settings step:
- In the Valid redirect URIs field, specify the URL such as
https://example.com/auth/sso, whereexample.comis the domain name or IP address of the platform. The specified address will be used for redirection after user authentication. This value (without the/auth/ssosuffix) must be specified in the platform when connecting SSO authorization in the VMmanager platform address field. - In the Web origins field, specify the URL such as
https://example.com, whereexample.comis the domain name or IP address of the platform. - Click Save button.
- In the Valid redirect URIs field, specify the URL such as
- Go to the Credentials tab:
- In the Client Authenticator parameter, leave the value Client ID and Secret — authentication by Client ID and Client secret.
- Save the value from the Client Secret field. You will need to specify this value in the platform when connecting SSO authorization in the Client secret field.
- Go to the Advanced tab:
- In the ID token signature algorithm parameter, select the RS256 value — RS256 algorithm for token signatures.
- Leave the ID token encryption key management algorithm and ID token encryption content encryption algorithm parameters blank — token encryption is disabled.
- Click Save button.
- Go to the Client Scopes tab and specify settings so that the server response contains data about user groups:
- Click on entry like
<Client_id>-dedicated→ Configure a new mapper button → type Group Membership. - In the Name field, enter the arbitrary name.
- In the Token Claim Name field, enter:
member_of - Leave the Add to ID token option enabled.
- Click Save button.
- Click on entry like
AD FS (Windows Server 2025)
Save the SSO configuration URL:
- Go to Service → Endpoints.
- In the OpenID Connect section, save the URL Path value for the OpenID Connect Discovery parameter. It usually looks like
/adfs/.well-known/openid-configurationThis value, along with the domain name, will need to be specified in the platform when connecting SSO authorization in the SSO configuration URL field. For example,https://example.com/adfs/.well-known/openid-configurationWhen configuring authorization, enter the domain name in FQDN format. For example, https://example.com. Authorization by server IP address is not supported.
Create a new application group:
- Go to Application Groups → Add Application Group.
- At the Welcome step:
- In the Name field, enter the arbitrary name.
- Select the template Server application accessing a Web API.
- At the Server application step:
- Specify the new Client Identifier value or use existing one. You will need to specify this value in the platform when connecting SSO authorization in the Client ID field.
- In the Redirect URI field, specify the URL like
https://example.com/auth/sso, whereexample.comis the domain name or IP address of the platform. Click Add button. The specified address will be used for redirection after user authentication. This value (without the/auth/ssosuffix) must be specified in the platform when connecting SSO authorization in the VMmanager platform address field.
- At the Configure Application Credentials step:
- Enable the Generate a shared secret option.
- Save the value from the Secret field. You will need to specify this value in the platform when connecting SSO authorization in the Client secret field.
- At the Configure Web API step:
- In the Identifier field, enter:
vmmanager6 - Click Add button.
- In the Identifier field, enter:
- At the Configure Application Permissions step:
- In the Permitted scopes section, enable the openid option.
To have the server response contain data about user groups:
- Open the group settings: select a group → Properties.
- In the Properties window, select Web API → Edit button.
- Go to the Issuance Transform Rules tab → Add rule button.
- Select the template Send LDAP Attributes as Claims → Next button.
- In the Claim rule name field, enter the arbitrary rule name.
- In the Attribute store field, select Active Directory.
- In the LDAP Attribute column, select one of the values starting with
Token-Groups. This affects the format in which the OIDC role must be specified when connecting SSO authorization in the platform:- Token-Groups as SIDs — group SID. For example,
S-1-5-21-123456789-123456; - Token-Groups - Qualified by Domain Name — domain name in NetBIOS format and group name. For example,
DOMAIN\Admins; - Token-Groups - Qualified by Long Domain Name — domain name in FQDN format and group name. For example,
example.com\Admins; - Token-Groups - Unqualified Names — group name only. For example,
Admins.
- Token-Groups as SIDs — group SID. For example,
- In the Outgoing Claim Type column, enter:
member_of - Click Finish → OK → OK.
Configuring on platform side
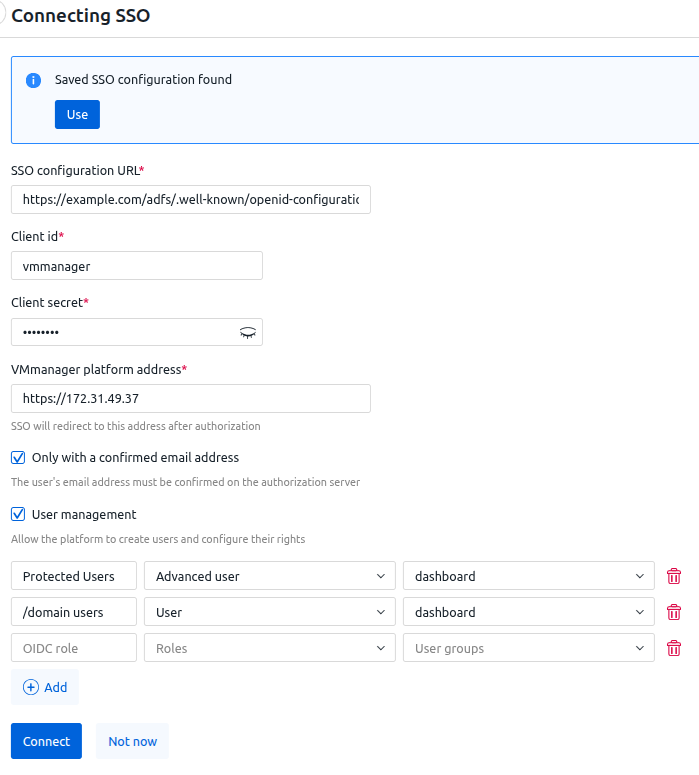
To manage SSO authorization, click the  icon in the right-hand menu → Global settings tab → Authorization via SSO section. If authorization is enabled, the configuration URL is displayed in the section. If not, the message "Not connected" is displayed.

To enable authorization:
- Click connect button.
- If you have already configured SSO authentication on this platform, a banner saying "Saved SSO configuration found" will appear on the configuration form. To use the added configuration, click Use button.
- If you need to use a new configuration, specify the authorization settings:
- SSO configuration URL.
- Client ID.
- Client secret.
- VMmanager platform address.
- To allow authorization only for users with an email address confirmed on the registration server, enable the Only with a confirmed email address option.
This option is not supported for AD FS. - To enable the platform to create users from SSO and configure their rights:
- Enable the User management option.
- Specify the rules for matching OIDC roles to roles in the platform. To do this:
- Click Add button.
- Enter the OIDC role.
- Select Roles of the platform. For each OIDC role, you can select one preconfigured role (Administrator, Advanced user, User) or any number of custom roles.
- If you need to add users to groups, select User groups.
- To add another rule, click Add button. To delete a rule, click the
 icon.
icon.
- Click Connect button.
The platform does not verify the Client ID and Client secret values when saving settings. To test the connection, log in as any user via SSO.
To disable authorization, click disable button.
To change the authorization settings, click edit button and specify the new settings.
Diagnostics
To diagnose problems related to SSO authentication, examine the auth container logs.