
VMmanager 6 comes with a Migration Tool for migrating virtual infrastructure from the fifth version of the product to the sixth. In the first release dated March 22, the Migration Tool works with restrictions: it only supports migrating simple virtual machine types to VMmanager 6. By Q2 2022, we will finalize the Migration Tool enabling to automatically migrate any VMs to VMmanager 6. Read more about the technical features of the solution and further plans in our article.
Contents
- Summary of the stages of migration
- Recommendations before migration
- Migration stage 1. Moving IP addresses from IPmanager 5 under the management of VMmanager 6 (optional);
- Migration stage 2. Importing the VMmanager 5 cluster under the management of VMmanager 6 and, if necessary - reconfiguring the BILLmanager services
- 2.1. Moving VMs from VMmanager 5 to a temporary cluster in VMmanager 6
- 2.2. Reconfiguring services in BILLmanager - if you had used VMmanager 5 and BILLmanager 6 integration
- Migration stage 3. Migrating VMs from a temporary cluster to another VMmanager 6 cluster
- Plans for the development of Migration Tool in 2022
- Migration Tool operation memo
Let us start with a brief description of the stages of migration, and then consider each of them in more detail.
A brief description of the stages to migrate VMs from VMmanager 5 to VMmanager 6
There are three main stages to migration of VMs from VMmanager 5 to VMmanager 6:
- Migration of IP addresses from IPmanager 5 to VMmanager 6 - for IPmanager users only.
- The second stage involves two steps:
- Importing nodes from VMmanager 5 to a temporary cluster in VMmanager 6 A temporary cluster is created in the platform automatically. VM management is limited in it. After importing VMmanager 5, it is blocked.
- Reconfiguring services in BILLmanager - if the integration between VMmanager 5 and BILLmanager had been set up.
- Migrating VMs from a temporary cluster to another VMmanager 6 cluster. This step is necessary so that users can fully manage their VMs. In the first version of March 22, migration from a temporary cluster works with restrictions: you can only migrate simple types of VMs and only to clusters with the Switching network configuration type. By the end of Q2 2022, we will expand the functionality of the Migration Tool - it will be possible to automatically migrate any VMs without restrictions and into an IP-fabric cluster.
Read more about the technical features and conditions of migration in our material below. We will explain the restrictions, and it is recommended that you read this information carefully. At the end of the material, there is a memo where we have put together the most important information about the Migration Tool.
Recommendations before migration
Before migrating, it is recommended to create a backup of all objects that are used in your system - VMmanager 5, BILLmanager, and IPmanager. VMmanager 6 will back up your platform automatically before migration.
Documentation regarding backups:
VMmanager 5 backup
BILLmanager backup
Migration stage 1. Moving IP addresses from IPmanager 5 to the management of VMmanager 6 (optional)
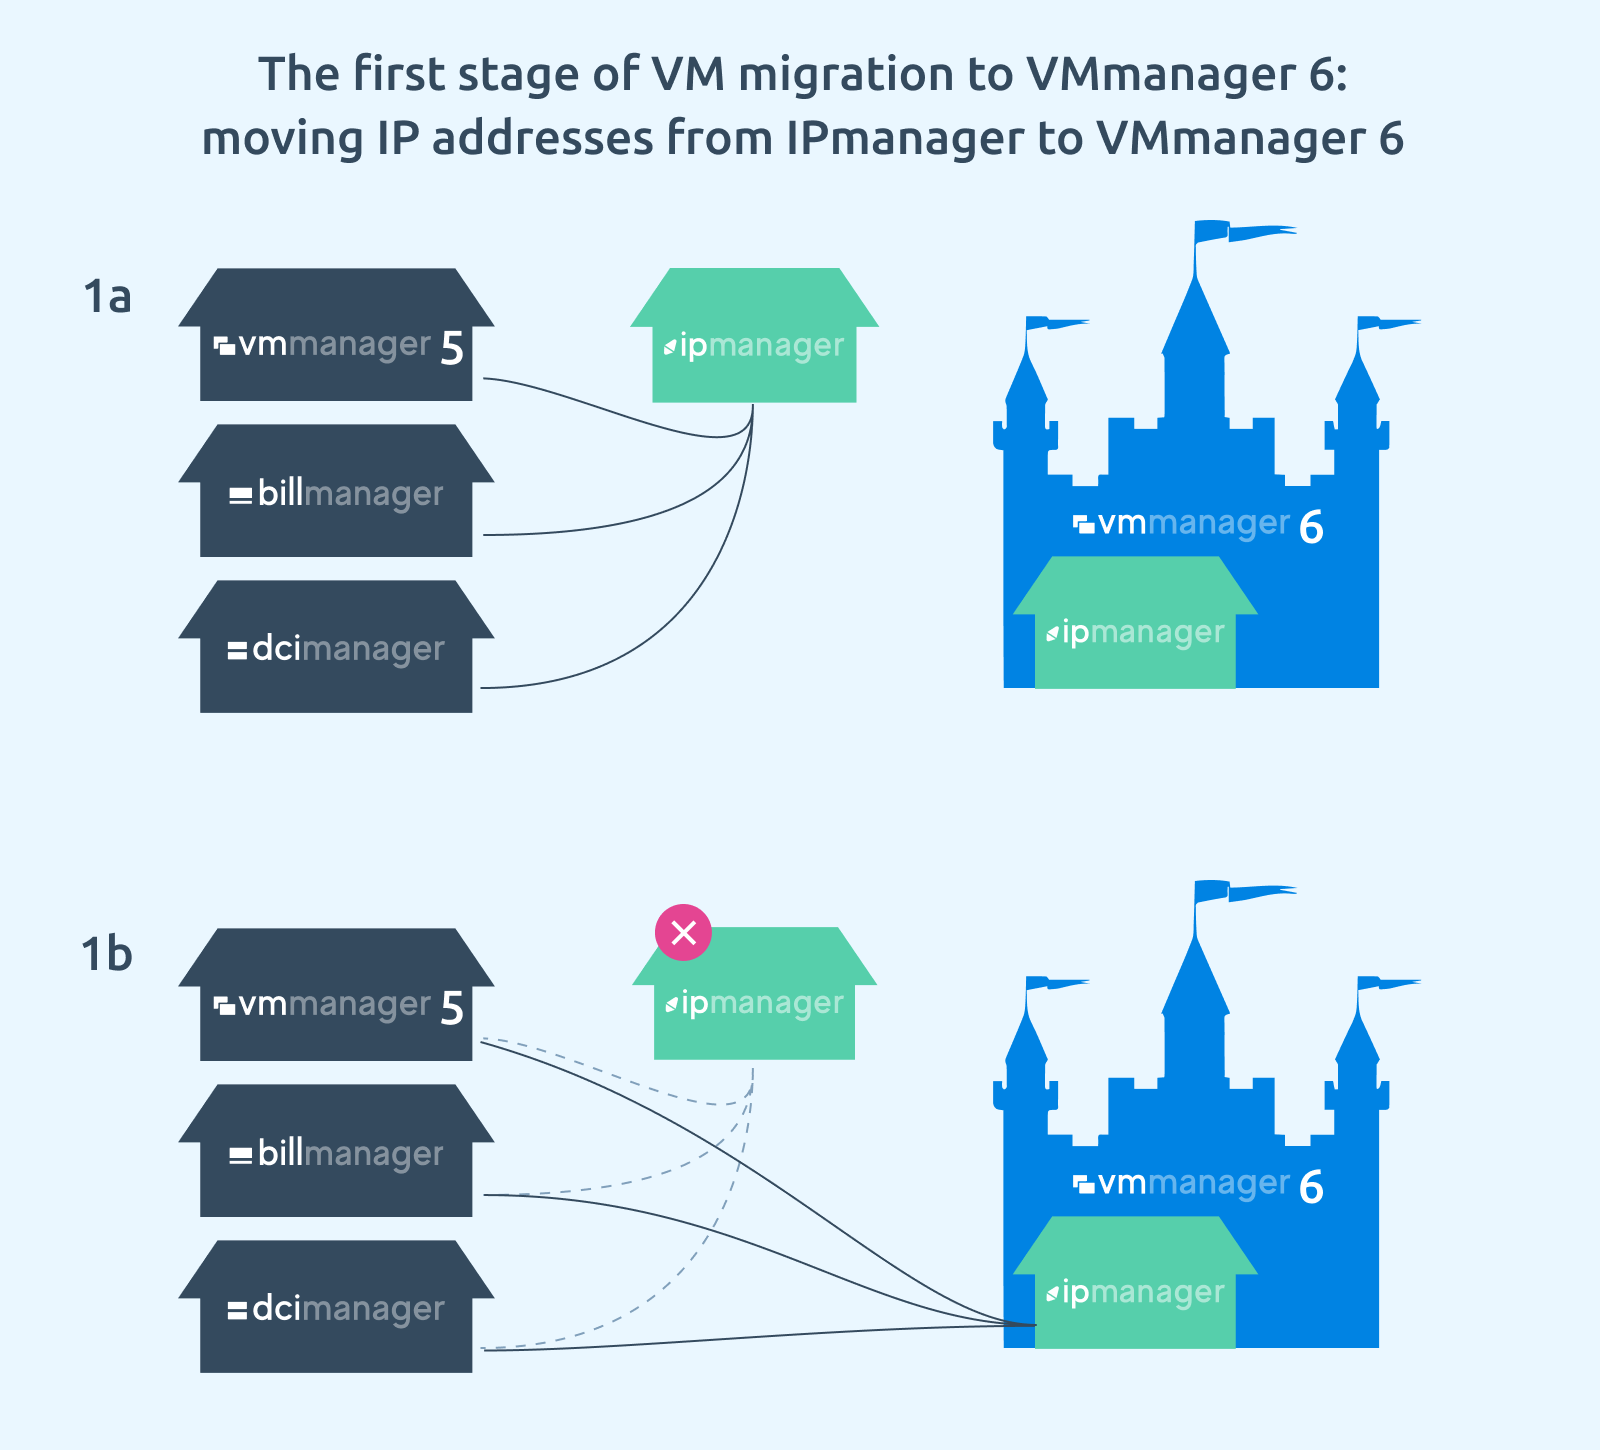
If you are using IPmanager to manage IP addresses, we recommend that you move them to VMmanager 6. IPmanager 6, which is built into VMmanager 6, allows you to manage IP addresses in all ISPsystem products of both the fifth and sixth versions: VMmanager, DCImanager, ISPmanager, BILLmanager. In addition, the built-in IPmanager 6 supports emulation of IPmanager 5.
Here are some advantages of managing IP addresses in VMmanager 6:
- The speed is faster than with IPmanager;
- Individual IPv6 support;
- Support for VxLANs with the ability to provide IaaS service - you can allocate virtual networks to your clients.
After migrating IP addresses in VMmanager 6, you will be able to manage them in a single interface, without separating network segments between the fifth and sixth versions of the products.
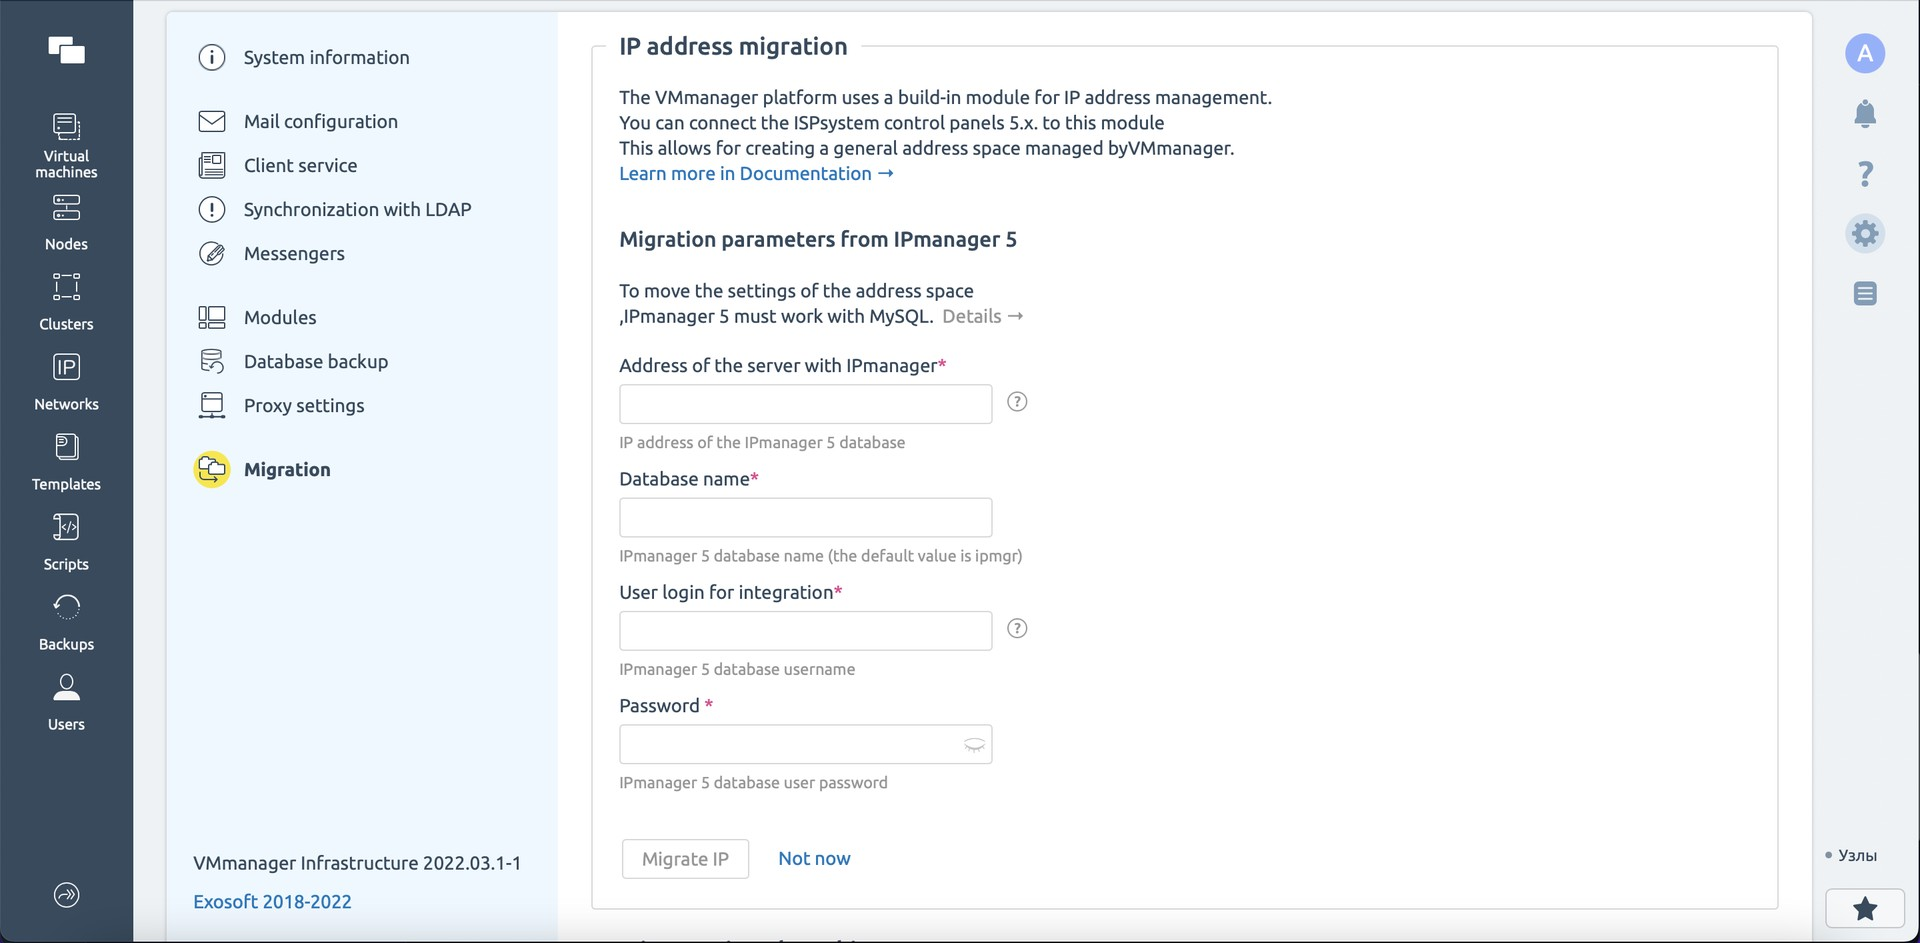
Documentation: moving IP addresses from IPmanager to VMmanager 6
Migration stage 2 – connecting the nodes. Importing the VMmanager 5 cluster under the management of VMmanager 6 and, if necessary - reconfiguring the BILLmanager services

The second stage of migration involves two steps:
- 2.1. Importing nodes together with VMs from VMmanager 5 to a temporary cluster with limited functionality in VMmanager 6;
- 2.2. Reconfiguring services in BILLmanager - if VMmanager 5 is integrated with BILLmanager.
We will talk about these sub-items in more detail.
2.1. Importing nodes from VMmanager 5 to a temporary cluster in VMmanager 6
Nodes are imported into VMmanager 6 in the following sequence:
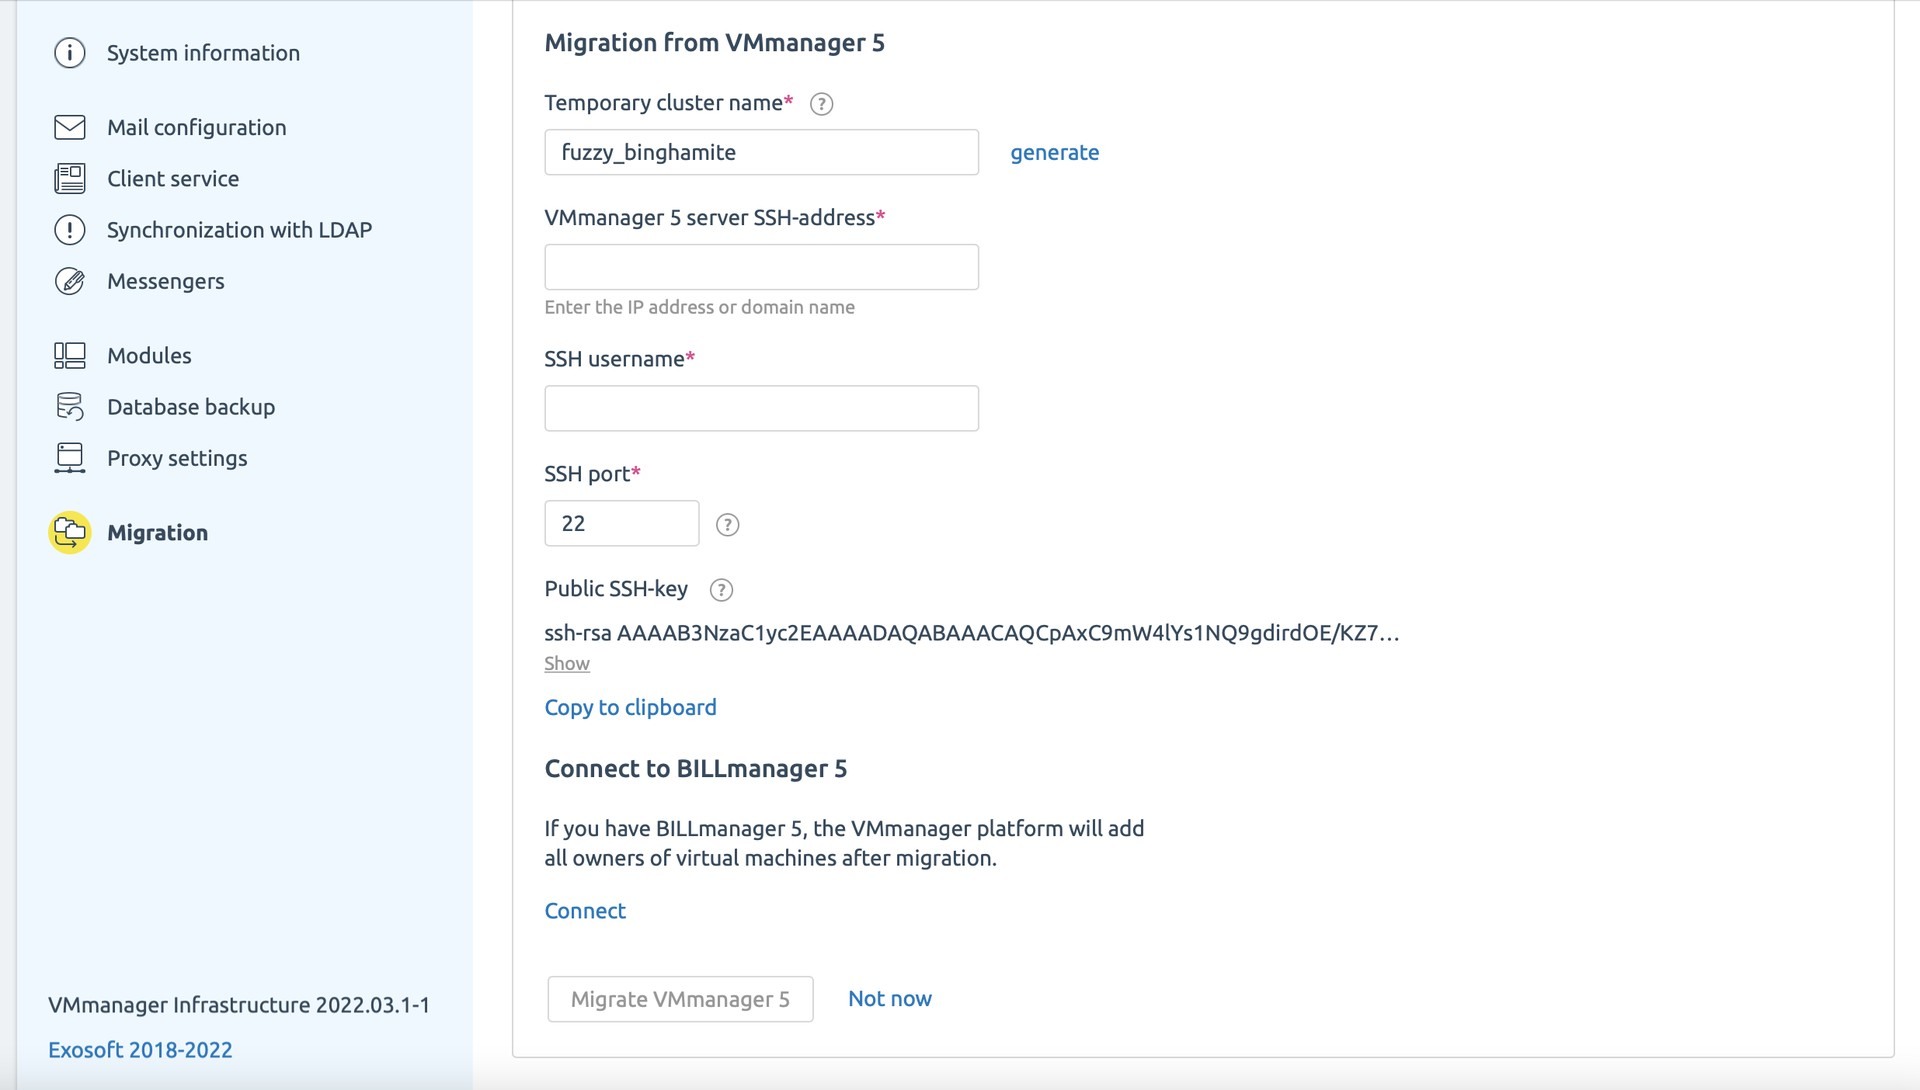
- The administrator specifies settings in VMmanager 6 to connect to VMmanager 5 and executes the migration command;
- VMmanager 6 automatically backs up its settings;
- VMmanager 6 creates a temporary cluster. All nodes from VMmanager 5 with virtual machines are connected to it.
- VMmanager 5 panel is blocked - this will prevent a conflict of the two node management centers (split-brain).
- Virtual machines from VMmanager 5 become available in the VMmanager 6 temporary cluster. Meanwhile, management of VMs in the temporary cluster is limited. Once the nodes are connected to the temporary cluster, only the following functions will be available to the virtual machines:
- power on;
- power off;
- reboot;
- connection via VNC;
- delete;
- migration among nodes within the temporary cluster.
Restrictions on managing VMs in a temporary cluster are due to the fact that the VMmanager 5 nodes have old software - OS, Qemu, Libvirt, etc.
The temporary cluster in VMmanager 6 is marked with a special sign.
How to return VMs from a temporary cluster to VMmanager 5
VMs in the temporary cluster can be returned to VMmanager 5. To do this, unlock the VMmanager 5 panel and be sure to restore the VMmanager 6 backup.
Note:
Simultaneous management of nodes from VMmanager 5 and VMmanager 6 is prohibited. You can turn the VMmanager 5 panel back on after migration only if the following conditions are fulfilled:
- You did not perform any actions on infrastructure objects through VMmanager 6
- You will disable management of these nodes in VMmanager 6 using a platform backup.
Otherwise, a conflict of control of the object from the two products may occur.
Reconfiguring services in BILLmanager - if VMmanager 5 and BILLmanager 6 integration exists
To integrate with BILLmanager, VMmanager 6 uses its own processing module different from VMmanager 5. Therefore, when you connect nodes from VMmanager 5 to a temporary VMmanager 6 cluster, you can transfer services to another type of processing module automatically. This requires to:
- Specify the parameters of connection to BILLmanager;
- Create a temporary administrator account in BILLmanager (for example, migrate_admin). This user must have full access to BILLmanager;
- Connect to the server with BILLmanager via SSH with superuser permissions.
- Generate a random combination (key) with a length of at least 16 characters.
- Copy the key to the clipboard.
- Execute the command to create a login key: /usr/local/mgr5/sbin/mgrctl -m billmgr session.newkey username=<integration user> key=<temporary key>
Migrating VMs from a temporary cluster: settings in the VMmanager 6 interface
Stage 3. Migrating VMs from a temporary cluster to another VMmanager 6 cluster
Note: After this step, the return of infrastructure management in VMmanager 5 will be unavailable. Be sure to understand all restrictions before you proceed with this step.
To fully manage VMs migrated from VMmanager 6, you must migrate them from a temporary cluster to another, regular VMmanager 6 cluster. In the first release of the Migration Tool dated March 22, migration works with restrictions: you can only migrate certain types of VMs and only to clusters with Switching network configuration.
Migrating a VM to an existing cluster will allow you to “relieve” the temporary cluster nodes in order to update the software on it and connect it to an existing cluster.
Refer to the list of restrictions below. We recommend that you read them carefully - after migrating VMsfrom a temporary cluster, it will be impossible to migrate them back to VMmanager 5.
Migrating VMs from a temporary cluster: Requirements for VMs and for the cluster
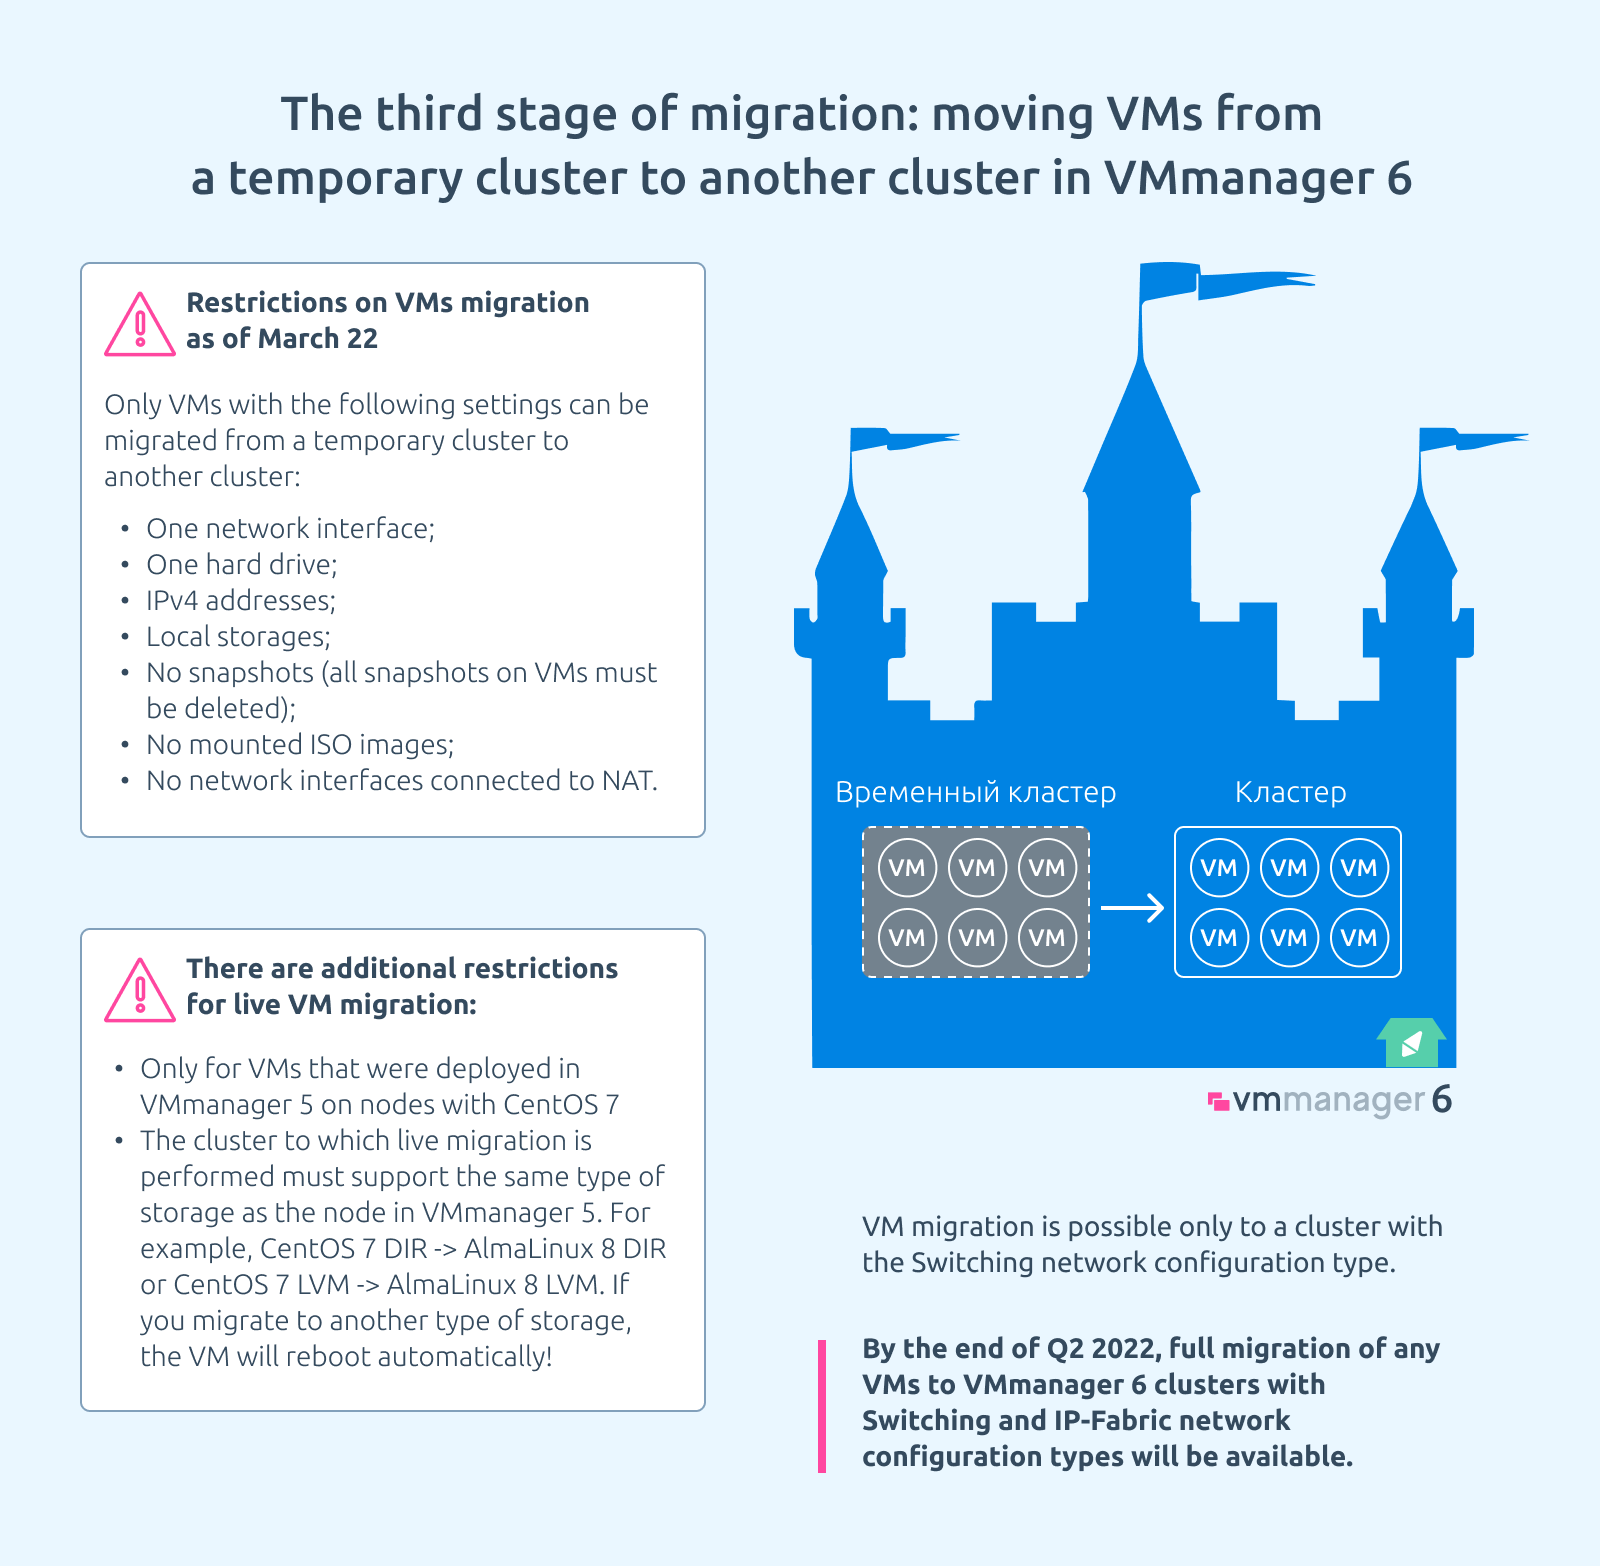
In the March 22 update, you can move VMs from a temporary cluster to another cluster only if they fit the following criteria:
- One network interface;
- One hard drive;
- IPv4 addresses;
- Local storages;
- No snapshots (all snapshots on VMs must be deleted);
- No mounted ISO images;
- No network interfaces connected to NAT.
There are additional restrictions for live VM migration:
- Only works for VMs that were deployed in VMmanager 5 on nodes with CentOS 7
- The cluster to which live migration is performed must support the same type of storage as the node in VMmanager 5. For example, CentOS 7 DIR -> AlmaLinux 8 DIR or CentOS 7 LVM -> AlmaLinux 8 LVM. If you migrate to different type of storage, the VM WILL REBOOT AUTOMATICALLY.
The network configuration type must be Switching on the cluster to which the virtual machines are migrated.
During the second quarter of 2022, we will be expanding the capabilities of the Migration Tool. This will allow you to automatically migrate any VMs from VMmanager 5 to VMmanager 6. Now let us explain our plans for the future.
Plans for the development of the Migration Tool in 2022
In April, we will add the ability to fully migrate any VMs to VMmanager:
- with any number of network interfaces;
- with any number of hard drives;
- with use of IPv4 / IPv6;
- with local or network Ceph and SAN storage;
- with snapshots;
- with mounted ISO images;
- with QEMU-GA support.
In May, we will add the ability to migrate VMs from a temporary cluster to a cluster with IP-Fabric network configuration.
Migration Tool operation memo
Here, we have collected the most important information on how the migration tool works, including technical limitations, development plans, and links to documentation.
Overview of the stages of migration
- 0. Preparation: backing up VMmanager 5, IPmanager, BILLmanager;
Documentation: VMmanager 5 backup BILLmanager backup - 1. Moving IP addresses from IPmanager 5 to VMmanager 6 – if necessary. Documentation: moving IP addresses from IPmanager to VMmanager 6
- 2. Migration from VMmanager 5:
- Moving VMs from VMmanager 5 to a temporary cluster in VMmanager 6. Documentation: moving VMs from VMmanager 5 to a temporary cluster in VMmanager 6
- 2.2 Reconfiguring services in BILLmanager – if necessary. Documentation: reconfiguring services in BILLmanager after migrating VMs from VMmanager 5
- 3. Migrating VMs from a temporary cluster to another VMmanager 6 cluster. Documentation: migrating VMs from a temporary cluster to another VMmanager 6 cluster
Restrictions on managing VMs in a temporary cluster in VMmanager 6
| Available operations | Unavailable operations |
|---|---|
|
power on; power off; reboot; connection via VNC; delete; migration to a VM6 cluster with the Switching network configuration type and KVM virtualization; migration among nodes within the temporary cluster. |
- reinstalling the guest OS, - recovery mode; - mounting an ISO image; - editing resources; - editing fine settings; - cloning; - creating backups; - restoration from a backup; - creating images; - editing the password; - running scripts; - connecting a virtual disk; - disconnecting a virtual disk; - adding a virtual network interface; - adding an IP address. |
Restrictions on VMs migration as of March 22
Only VMs with the following settings can be migrated from a temporary cluster to another cluster:
- One network interface;
- One hard drive;
- IPv4 addresses;
- Local storages;
- No snapshots (all snapshots on VMs must be deleted);
- No mounted ISO images;
- No network interfaces connected to NAT.
There are additional restrictions for live VM migration:
- Only for VMs that were deployed in VMmanager 5 on nodes with CentOS 7
- The cluster to which live migration is performed must support the same type of storage as the node in VMmanager 5. For example, CentOS 7 DIR -> AlmaLinux 8 DIR or CentOS 7 LVM -> AlmaLinux 8 LVM. If you migrate to another type of storage, the VM WILL REBOOT AUTOMATICALLY.
VM migration is possible only to a cluster with the Switching network configuration type.
By the end of Q2 2022, full migration of any VMs to VMmanager 6 clusters with Switching and IP-Fabric network configuration types will be available.
Do you have any questions left? Feel free to contact us!
If you have any questions about using the Migration Tool, let us know — we will be happy to consult you and help you migrate.