
QA-engineer Anton Ryazantsev shares how ISPsystem saves 15 man-hours per week.
Why automate the creation of test benches
In product teams, we strive to automate routine jobs that are time-consuming. Sometimes we use our own products for this. For example, VMmanager helps us deploy test benches. In the process of development and testing, you need to create test benches quite often, and you want to make this process as simple as possible. Our product code is stored in Gitlab and our CI/CD processes are also organized there. Therefore, it is convenient to integrate Gitlab and VMmanager to create test benches.
How launching a test bench creation is implemented in Gitlab
The developer prepares a branch in the Gitlab repository. The pipeline of this repository includes manual jobs. Each of them installs a product from the branch on a certain test bench. The test bench is a virtual machine on VMmanager. Every developer and tester has such a virtual machine and a manual job for it.

When necessary, the user (developer or tester) starts the job.
The ID of the virtual machine to which it deploys the test bench, as well as the ID of the script in VMmanager and parameters for it are specified for the job.
The job performs the necessary actions on the virtual machine using VMmanager API:
- Reinstalls the operating system to clear the virtual machine of the results of previous use.
- Executes the VMmanager script with parameters to deploy a test bench with the product the user wants to work with.
The user has to wait until the job is completed to get the ready-to-go test bench.
job example:
variables:
  RECIPE_ID: 1
.stand_setup:
  stage: VM6_stand
  image: python:3.9-alpine
  script:
    - echo “Run env install on vm $VM_ID”
    - python3 reinstall_vm.py --domain “$VM6_HOST” --login “$VM6_LOGIN” --password “$VM6_PASSWORD” --vm_id “$VM_ID” --platform “$PRODUCT” --vm_recipe “$RECIPE_ID” --intrepo_password “$CI_JOB_TOKEN” --token “$TOKEN” --branch “$CI_COMMIT_REF_NAME”
  when: manual

QA1_stand:
  extends: .stand_setup
  variables:
    VM_ID: 1
    PRODUCT: “dci”
    TOKEN: “$QA1_TOKEN”
The Python script reinstall.py is responsible for interacting with VMmanager 6 via API. It is not difficult to implement such a script in Python or Bash. This will require the use of API: API VMmanager.
The following are the script's arguments:
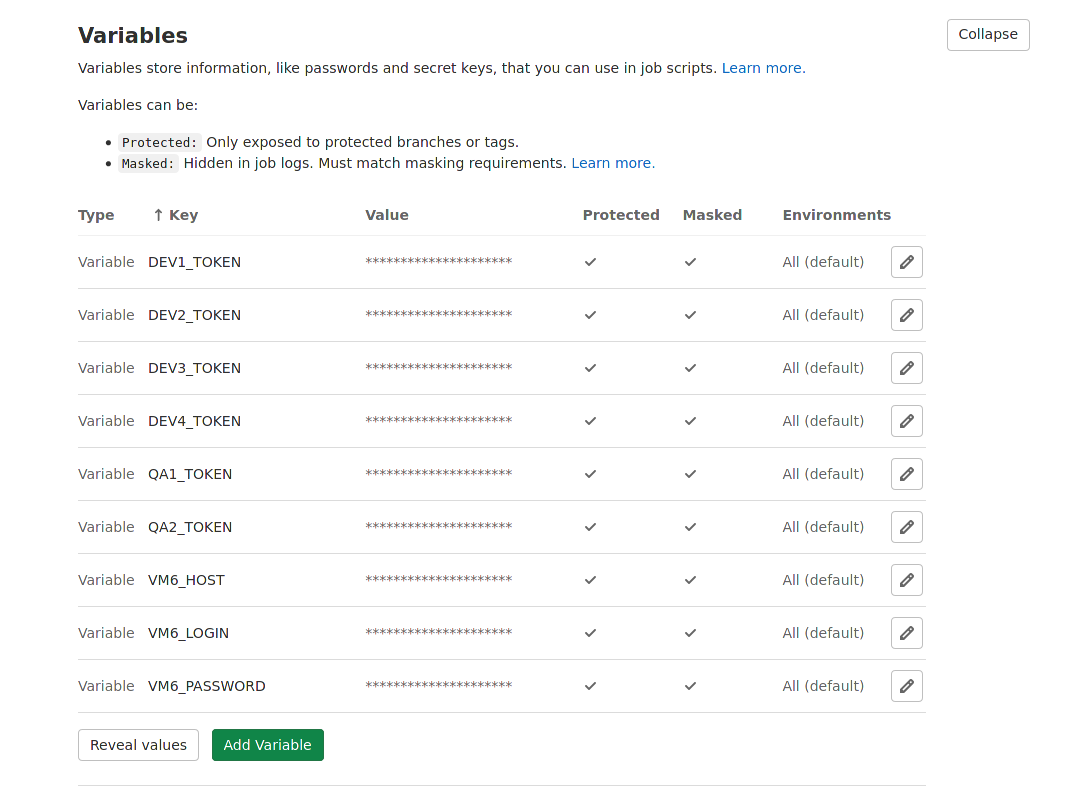
- VMmanager access details (VM6_HOST, VM6_LOGIN, VM6_PASSWORD).
- ID of the virtual machine on which the test bench will be deployed (VM_ID).
- The platform that we will install on the test bench (PRODUCT).
- ID of the script on VMmanager, which will install the necessary product on the virtual machine (RECIPE_ID).
- Password to access the internal repository (CI_JOB_TOKEN).
- The license token which is needed to install the required product (TOKEN).
- The branch in the repository from which the required product will be installed (CI_COMMIT_REF_NAME).
We store some of this data in Gitlab CI/CD Variables in a protected form.
How creating test benches is implemented using VMmanager
The script in VMmanager 6 contains a sequence of commands that installs and configures the test bench on the virtual machine.
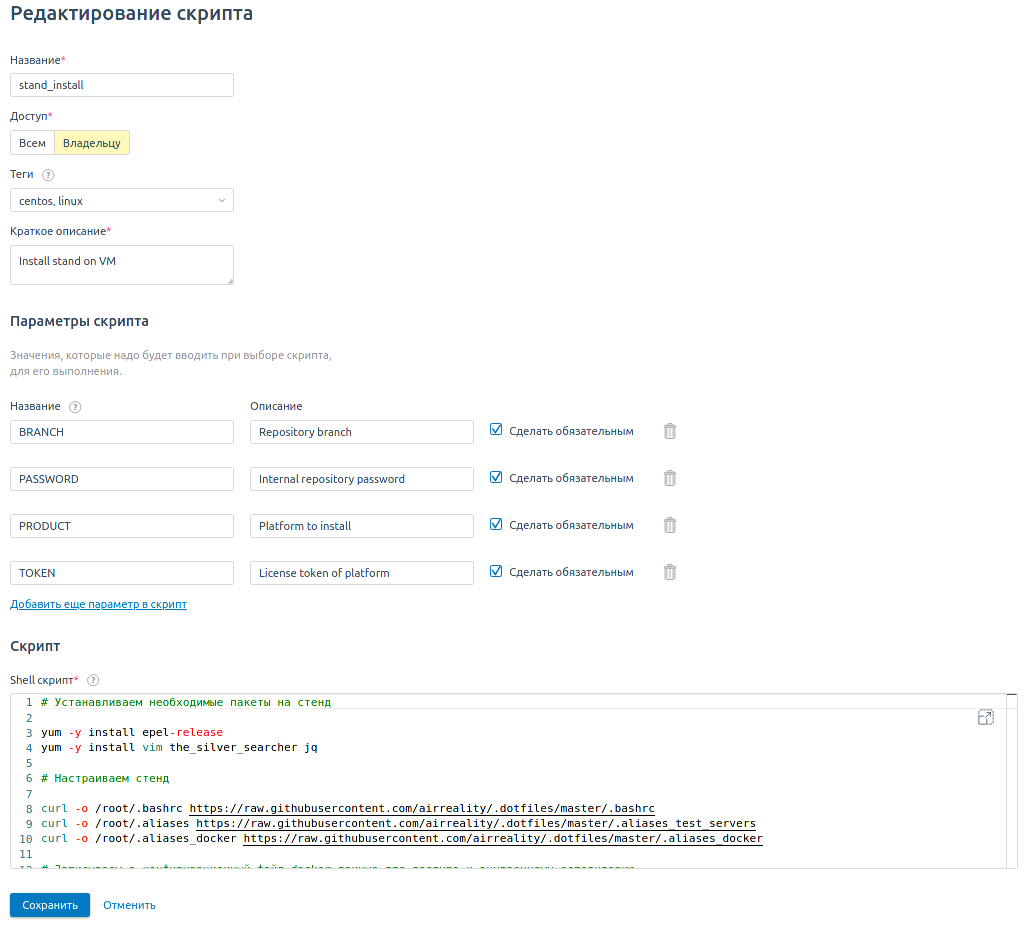
Script body:
# Install the necessary packages on the test bench

yum -y install epel-release
yum -y install vim the_silver_searcher jq

# Configure the test bench

curl -o /root/.bashrc https://raw.githubusercontent.com/airreality/.dotfiles/master/.bashrc
curl -o /root/.aliases https://raw.githubusercontent.com/airreality/.dotfiles/master/.aliases_test_servers
curl -o /root/.aliases_docker https://raw.githubusercontent.com/airreality/.dotfiles/master/.aliases_docker

# Write the data for accessing the internal repository in the docker configuration file

mkdir -p ~/.docker
echo '{"auths": {"internal.example.com": {"auth": "'$(echo -n "($LOGIN):($PASSWORD)" | base64)'"}}}' > ~/.docker/config.json

# Install the platform to be tested

curl -O http://internal.example.com/($PRODUCT)/($BRANCH)
chmod +x ($PRODUCT)
./($PRODUCT) install -l ($TOKEN)
The script contains the following parameters:
- PASSWORD
- PRODUCT
- BRANCH
- TOKEN
It is convenient and safe that this data does not appear anywhere. We do not need to write them into the body of the script before running it. Instead, we pass them once when we run the script through the API.
The global variable LOGIN is also used to access the internal repository. The login is always the same, so we store it in global variables.

This automation allows us to save a developer or tester about 15-20 minutes while setting up each test bench. On average, a new test bench has to be created about once a working day. So in a week we save about an hour and a half per person. In an average team of 10 developers and testers, this equates to about 15 hours that can be spent on other jobs.
Try VMmanager for automatic sale of SaaS and VPS hosting
VMmanager is a platform for virtualization and automatic provisioning of virtual machines.