 En
En
 Es
Es
This article contains instructions on how to configure the switches.
Information about ports
For management of switch ports, go to Equipment → Switches → choose the switch → Ports.
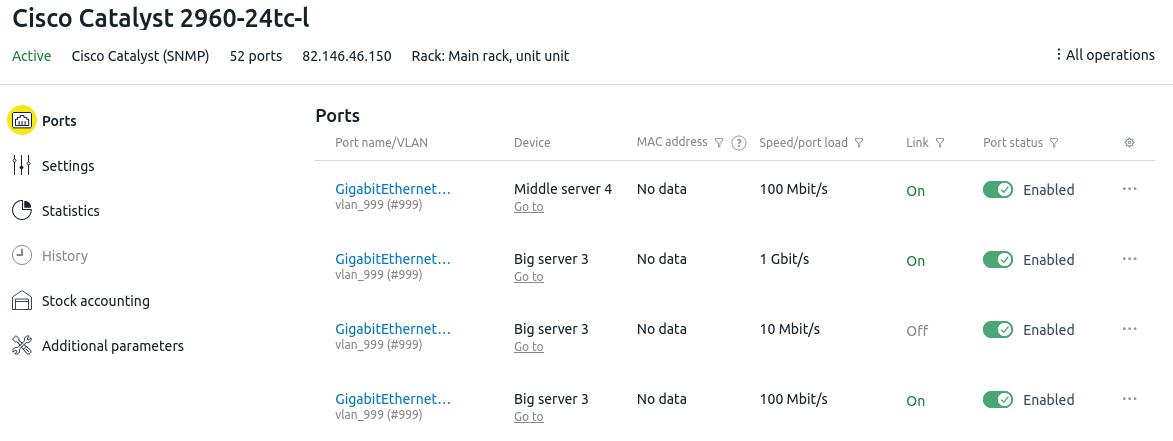
The port table contains the following information:
- port name;
- VLAN;
- the device to which the port is connected;
- MAC address. Displayed only for devices connected to switches from:
- Juniper;
- Cisco Catalyst and Nexus series;
- Arista;
- Brocade ICX series;
- Huawei;
- Mikrotik — depending on RouterOS version;
- connections speed;
- connection availability;
- port status — enabled or disabled.
You can filter the ports list by status, connection speed, connection availability or MAC address. For example, you can display only active ports or ports with a certain speed. To do this, press  in the required column of the table.
Poll the ports
DCImanager 6 polls the switch ports every five minutes. To get the current status of ports go to Equipment → Switches →  menu → Poll. The procedure will take some time depending on the equipment that you use.
Configure the ports
- Go to Equipment → Switches → click on the switch name → Ports → select a port.
- Enable or Disable the port if needed.
- Select Connection type:
- Available — no devices are connected to the port. Enable the Service option so that the port is not displayed in the general list;
- To server — select the Server connected to the port. Enable options:
- Connected to BMC — if the port is used to connect to BMC. BMC can only be connected to one of the switch ports;
- Disable traffic collection — if you do not need traffic statistics for this port;
- Other — enter the name of the End device connected to the port. Enable the Uplink option if this is the uplink port for connection to a switch or a router at a higher level. Changing of settings are disabled for uplink ports.
-
Set the port Speed.
Selecting "Auto" and "Auto 10/100 Mbit" will set the port speed automatically. Speed values depend on the server, switch and connection cable capability. - Select the port Mode.
- Auto — this mode is set automatically depending on the server, switch and connection cable capability;
- Full-duplex — the communication between sender and receiver can occur simultaneously;
- Half-duplex — data can be transmitted in two directions, but not at the same time.
Auto, 1 Gbit/s, and 10 Gbit/s speeds are automatically set to Full-duplex.
- Enter any information in the Note field. It will be displayed in the list of switches.
- Select the Access VLAN. One port can only belong to one VLAN. Read more in VLAN.
- To make the port a trunk port:
- Enable the Trunk-port option.
- Select Native VLAN — the VLAN in which untagged traffic is transmitted.
- Select Trunk members — VLANs which can send traffic through the port.
- Click on Save settings.

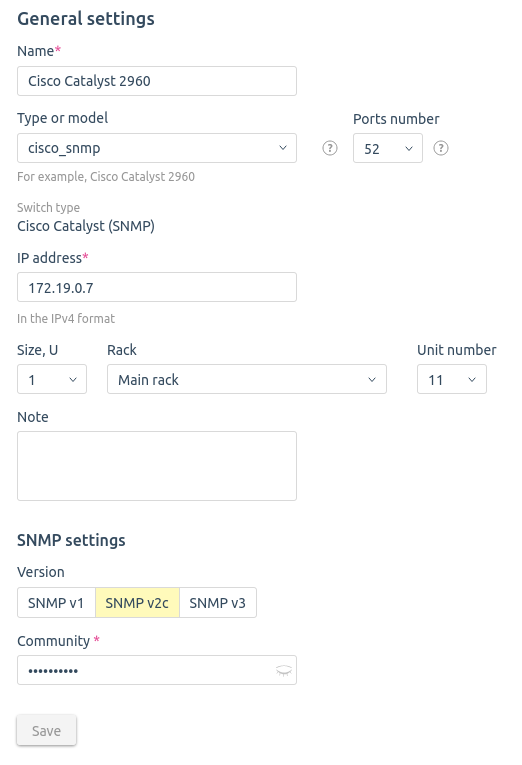
Edit switch settings
To edit the switch settings:
- Enter Equipment → Switches → click on switch name → Settings.
- Make the required changes. You can change the settings that were available when creating the switch, except the Switch type. Read more in Adding a switch.
- Press Save.
Port aggregation
Aggregation of channels in Ethernet networks allows combining several parallel data channels into one logical channel. Aggregated channels have increased bandwidth and a high level of reliability. Some switch models allow you to configure aggregation at the port level.
In the current version of DCImanager 6, you can manage aggregations created on Arista, Cisco Nexus, Mikrotik switches. For example, Arista DCS-7010T-48-R, Cisco Nexus 5000 Switch, Mikrotik CRS3XX.
To allow DCImanager 6 to find aggregated ports, enable the option Find aggregated channels automatically when adding a switch or in the switch settings.
Ports currently in aggregation are displayed in the general list with the status "In aggregation". You cannot enable, disable, or change settings or connections of these ports.
To manage aggregations, enter Equipment → Switches → click on the switch name → Ports → Aggregations.
You can perform the following aggregation operations through the  menu:
menu:
- enable/disable;
- connect to device;
- manage the aggregated port;
- add a comment.
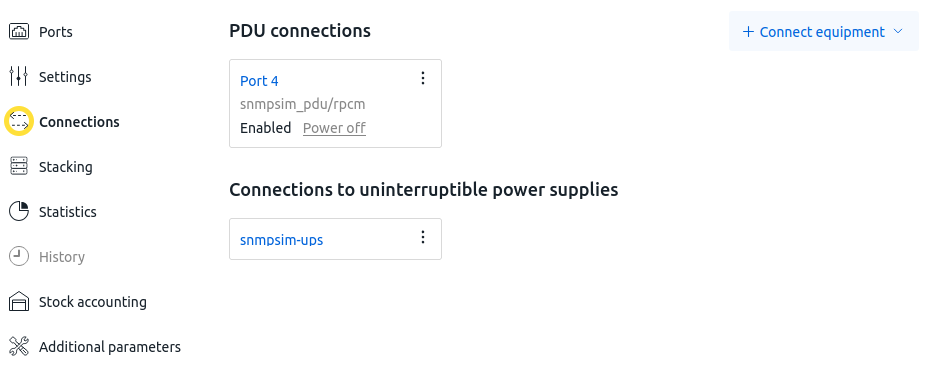
Manage power supplies
To view or configure the switch's power supplies, go to Hardware → Switches → click the switch name → Settings → Connections. You can manage two types of power supplies: UPS and PDU.
UPS
To add a connection to the UPS:
- Click Connect to UPS. If you already have power devices specified, click Add Connection → To UPS instead.
- Specify the device location:
- In the switch rack;
- In any rack;
- Select the UPS from the list.
- Click Save.
To open the UPS settings, click → Go to UPS.
To delete a connection to the UPS, click → Delete Connection → Delete.
PDU
To add a connection to the PDU:
- Click Connect to PDU. If you already have PDUs specified, click Add Connection → To PDU instead.
- Specify the device location:
- In the switch rack;
- In any rack;
- Select a PDU from the list.
- Select the PDU Port.
- Click Save.
To disconnect power to the switch from a specific PDU, click → Shutdown Port → Shutdown.
To change the PDU port to which the switch is connected, click → Settings → Select the desired port -< Save.
To open the PDU port settings, click → Go to PDU.
To delete the connection to the PDU, click → Delete Connection → Delete.
Stacking
You can stack switches together. This allows you to combine multiple switches into one logical unit that will have its own IP and MAC address. Each stack supports up to and including 8 switches.
To add switches to the stack:
- Go to Hardware → Switches → click the switch name → Settings → Stacking.
- Click Connect.
- Select a switch from the list.
To delete a switch from the stack:
- Go to Hardware → Switches → click the name of any switch that is part of the required stack → Settings → Stacking.
- In the row with the desired switch, click → Delete from the stack.
Each switch can only be in one stack at a time.
Related topics: