En
En
 Es
Es
To work with networks in DCImanager 6, go to Network → Physical networks. In this section, you can:
- add or remove a physical IPv4 or IPv6 network;
- change network settings;
- view the h istory of actions in the network;
- reserve an IP address.
Network hierarchy
You can create physical networks of two types:
- Container — a network that allows creating child networks within it for convenient IP address management. IP addresses of such a network can only be occupied by child networks; they cannot be allocated to devices or pools;
- Active — a network from which you can allocate IP address pools and IP addresses for devices. Such a network cannot have child networks.
A child of a network with the Container type can also have the Container type and its own child networks.
If a network with the Container type has no children, you can change its type from Container to Active when modifying the network settings. The platform does not support changing the network type from Active to Container.
If the address space of network B is completely within the address space of Container network A, then network A is the parent network, and B is a child. The platform automatically determines whether a created network is a child or parent of another network. For example, if you have a network 10.16.0.0/16 with the Container type, then a created network 10.16.10.0/24 will automatically become its child.
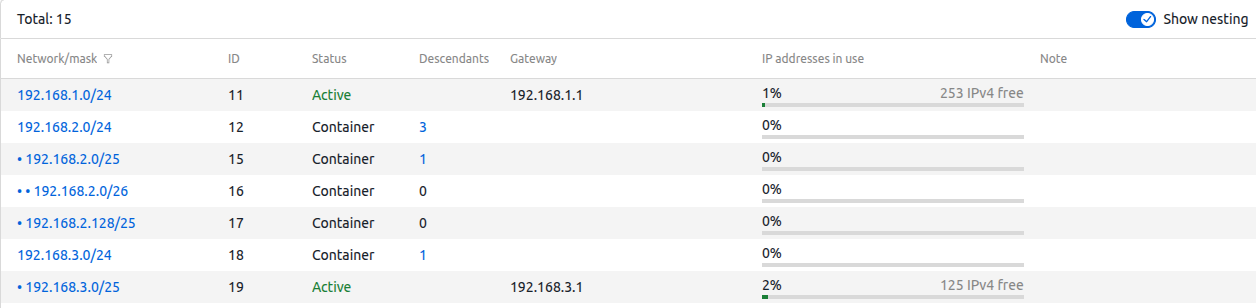
To see the list of networks in a hierarchical view, go to the Networks → Physical Networks section and click Show nesting. After this:
- all table filters will be disabled;
- networks will be sorted by hierarchy. For example:
- networks without children or parent networks;
- parent network 1;
- first-level child network 1;
- second-level child network 1;
- first-level child network 2;
- first-level child network 1;
- parent network 2;
- child network;
- In the Network column, the number of dots in each row indicates how many parent networks are located above that network in the hierarchy.
To see the list of child and parent networks:
- Go to the Networks → Physical Networks section → click on the desired network → Networks.
- Click Parent or Child.
How to create a network
To create a physical network:
- Go to Network → Physical networks → Create a physical network.
-
Specify a Network in the following format <network IP address>/<network mask prefix>. E.g. "172.0.0.0/24" or "2001:0db8:85a3:0001::/64".
Prefix lengths greater than 64 are not supported for IPv6 networks. - Specify a network type:
- Active;
- Container.
-
If the network type is Active, specify a Gateway.
The gateway must be one of the network addresses. - If the network will be used at all locations, enable the option The network is accessible on all locations .
-
If needed, specify the network information:
- VLAN id;
- DNS servers;
- NTP servers.
These field are for information only. They do not affect network in any way. - Specify an arbitrary Note to the network.
- To create an IP pool:
- Select the Create an IP pool and range checkbox.
- Enter a Pool name.
- Specify the IP range from the network that can be used for the pool. You can enter a single IP address ("1.1.1.1"), a mask ("1.1.1.1/24") or a range ("1.1.1.1-1.1.1.5").
- Enable the pool on the cluster nodes.
- Click Create.
Changing network settings
To change your physical network settings, go to Network → Physical networks → select network →  menu → Settings.
To delete a physical network, go to Network → Physical networks → select network → menu → Delete network.
History of actions in the network
To view the history of actions, go to Network → Physical networks → select the network → History. The history page displays information about:
- adding and removing IP addresses;
- changing the domain name for the IP address.
Managing PTR Records
To view PTR records associated with network addresses, go to Networks → Physical Networks → select the network → PTR Records.
To add PTR records:
- Go to Networks → Physical Networks → select the network → PTR Records.
- Click Add PTR Records.
- Specify the records in the format <network address> <domain name>. For example, "10.16.16.10 ntp.example.com". You can use IPv4 and IPv6 addresses.
- Click Add PTR Records.
Managing IP addresses
To view all IP addresses used, enter Networks → Physical networks → select the network. You can filter the list of addresses on this tab by IP address or hostname. In the Note column, you can add a comment to the IP address.
You can reserve individual IP addresses in the network. DCImanager 6 will not use these addresses when assigning IP addresses to equipment.
To reserve an IP address, click Assign IP addresses:
- Specify the IP address or subnet.
- Specify the Host name.
- To prevent the IP address from being deleted, enable the Protect the IP address from accidental deletion option.
- Specify a discretionary Note.
- Press Apply.
Networks management
Free IP addresses
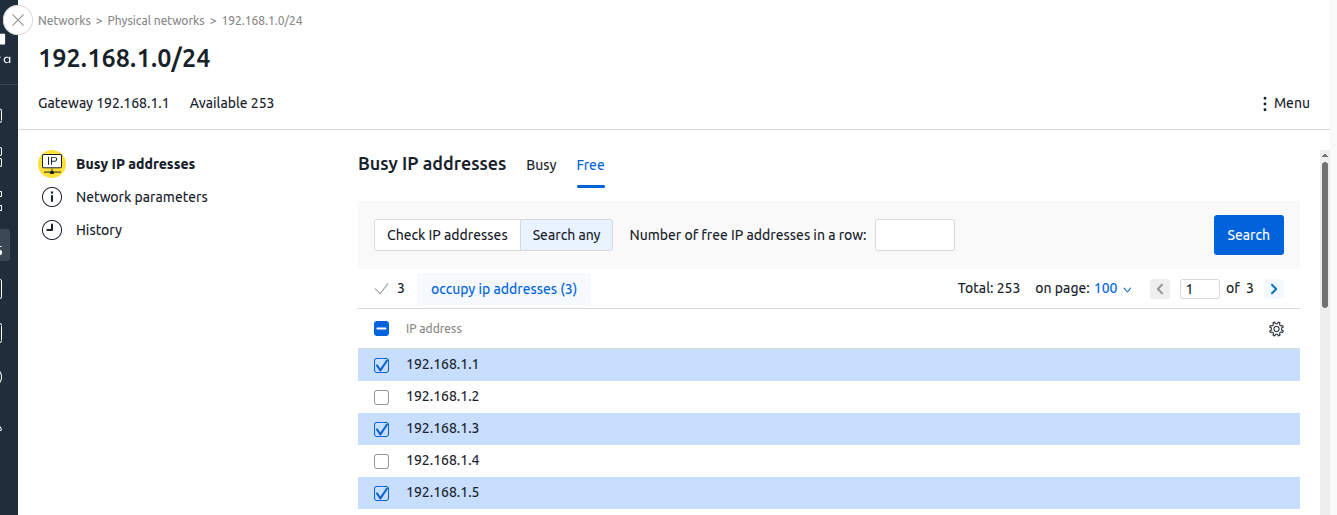
To view free addresses on an IPv4 network, go to Networks → select a network → IP addresses tab → Free tab.
To check if a specific address or range of addresses is free, click Check IP addresses → enter the IP address or range (e.g. 192.168.1.1.1-192.168.1.10) → Search button.
To find a free range of IP addresses, click Search any → enter the Number of free IP addresses in a row → Search button.
You can reserve free IP addresses:
- If you need to reserve one address, select the row with that address and click the Occupy IP address button. If you need to reserve multiple addresses, select the rows with the desired addresses and click the occupy ip addresses button in the table header.
- Specify the Domain name for which the address will be reserved.
- To ensure that the IP address cannot be deleted, enable the Protect the IP address from accidental deletion option.
- Enter an arbitrary Comment.
- Click the Allocate IP address button.