To add QIWI, you need to configure the settings on the payment gateway side and add the module in BILLmanager.
Configuring the payment method
Log in to QIWI and enter the following configuration details:
- Enable notifications.
- URL for notifications: "https://<URL_BILLmanager>/mancgi/qiwiresult"
- Activate signatures.
- Upload a certificate, if the server with the billing system uses a self-signed certificate.
- Click the button Change notification password to get a notification password.
- Navigate to Settings → Protocols → HTTP-protocol to make sure the HTTP is enabled. It is used for forwarding on the b2b.qiwi.com web-site.
- Make sure the Signature check box is selected in REST-protocol.
Configuring BILLmanager
Navigate to Provider → Payment method and complete the following fields:
- Step 1 — Select a payment method — choose "QIWI".
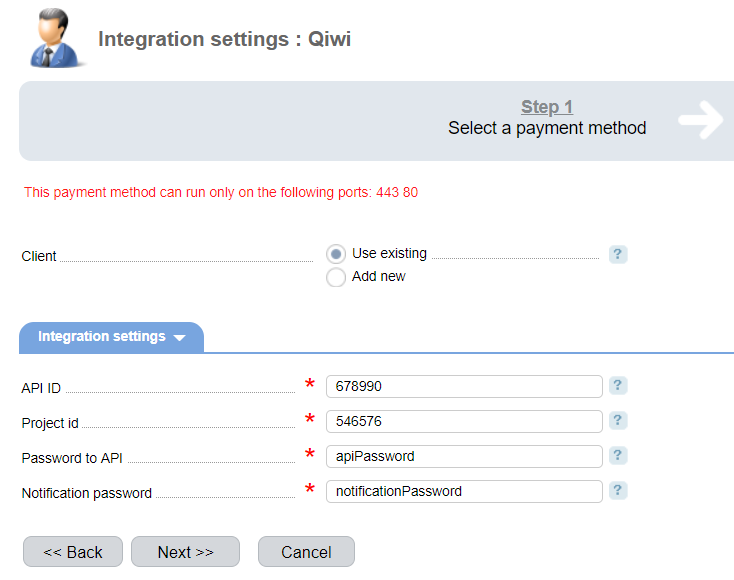
- Step 2 — Integration settings. Enter the integration details.
- Step 3 — Payment method settings. Enter the payment method parameters.
Integration

Client — select the existing account or register a new one. If you choose "Use existing", enter the following details:
API ID — enter the unique id of the API-requests gateway inside Visa QIWI Wallet.
Project ID — enter the project unique identifier inside Visa QIWI Wallet.
API password — enter the password to access API.
Notification password — enter the notifications password from the protocol settings inside Visa QIWI Wallet.
Selecting Add new will redirect you to the QIWI registration form.
Additional information
Refund
To allow for refunds navigate to Provider → Payment methods → Edit → check the Allow refund box. Refund can be made only for "Paid" payments.
Logging
QIWI has the following log files:
- '/usr/local/mgr5/var/pmqiwi.log' — configuration details of the payment method.
- '/usr/local/mgr5/var/qiwipayment.log' — payment log.
- '/usr/local/mgr5/var/qiwiresult.log' — responses from the payment gateway.
 En
En
 Es
Es

