 En
En
 Es
Es
This section describes how to configure a tariff plan with the processing module VMmanager 6. Basic configuration options can be found under How to add and configure a tariff plan.
Tariff settings
To configure a tariff, go to the Products → Tariff plans → click Add.
Main settings
VPS template — the name of the template that will be used for creating a virtual machine in VMmanager. The template defines what resources including their amount a client can use. Navigate to VMmanager → Templates → VM configuration.
If you plan to sell virtual machines with a specific configuration, enter the name of the configuration in the VPS template field.
If you specify a non-existing template, VMmanager will create a new one automatically. The name will be taken from the VPS template field. The template allows a customer to use unlimited resources.
One and the same resource may be specified in the VPS template in VMmanager and in the tariff plan in BILLmanager. In that case, the parameters in the billing platform will have higher priority.
Read more about configurations in Configurations of virtual machines in VMmanager documentation.
Example: the VPS template "Standard" in VMmanager has the following limits: 2 GB RAM and 10 GB disk space. In BILLmanager we create the tariff plan "VPS-standard. VMmanager" based on the template of the "Standard" account. The tariff plan price includes 1 GB RAM. Disk space is not configured.
When a client orders the service related to the tariff plan "VPS-standard. VMmanager", a virtual machine with 1 GB RAM and 10 GB disk space will be created.
Additional settings
A platform administrator can manage default add-ons from the product type settings. For example, to manage the OS template, see the article Operating systems available for order. VMmanager 6.
- OS templates — a list of operating systems that can be installed on virtual machines that will be created based on this tariff plan. The list is uploaded automatically from VMmanager 6. You can edit the list in Products → Product types → Parameters → Values → Tariff plans;
-
Cluster — A list of clusters to host virtual machines. To use the cluster that is specified in the handler, select the Default Cluster value;
When selecting a cluster, specify only the operating system templates that are available on the selected cluster. - A default domain template is used for generating a domain name if the client didn't specify it during the order. You can use the following macros in this field:
@USERNAME@— account username;@TYPE@— product type;-
@ID@— service unique identifier.How to use a macro
Tariff configuration
To configure the tariff content, go to the Products → Tariff plans section → select a tariff → Options button. For more details, see How to create and configure a tariff plan
Main parameters
The main parameters define the basic configuration of the virtual machine: the number of processors, the amount of RAM, and disk space. If the tariff settings specify an existing virtual server template, the processing module will take the values of these parameters from the template. If a non-existent template is specified in the settings, these parameters must be set manually. The description of the main parameters is provided in the table:
VMmanager 6 does not provide an option to reduce disk size. You can change the size of disk space only upwards.
To prevent the client from reducing disk space when ordering:
- Go to Products → Tariff Plans → select a rate plan → click Options.
- Create a resource with the condition Edit resource after order "Upgrade only".
Additional parameters
You can configure advanced VM options: network settings (IPv4/IPv6), IP address pools, backup parameters, OS and snapshot limits. Some of these parameters, when ordering via BILLmanager, are taken from the tariff contents, not from the VM template. The description of additional parameters is specified in the table:
snapshot_limit parameter from the tariff content. The value from the virtual server template will not be taken into account.Fine-tuning
If the values of the fine-tuning settings are not specified in the tariff, BILLmanager will use the values from the virtual machine configuration in VMmanager 6. If BILLmanager does not receive information from the VMmanager 6 configuration, the default fine-tuning settings values will be used when ordering a virtual machine.
*You can use the "CPU model" add-on only together with the "CPU emulation mode" add-on’s value of "custom". To add CPU models to BILLmanager, go to Products → Enumerations → CPU model → Add .
**The add-on "Bandwidth" is identical to the addons "Incoming traffic" and "Outgoing traffic". Use the "Bandwidth" add-on if the restrictions on incoming and outgoing traffic match. You can limit the VM bandwidth if the traffic threshold is exceeded.
In the LXD cluster, the following settings cannot be used simultaneously:
- "Disk read speed" and "Read operations per second";
- "Disk write speed" and "Writes operations per second".
Collecting statistics
The VMmanager 6 processing module allows collecting usage statistics for the following add-ons:
- Traffic (
bandwidth); - CPU usage intensity (
vcpu_load); - RAM usage (
mem_usage); - Disk space usage (
disc_usage); - Input/output operations (
iops_usage). The total number of operations for the add-ons is counted:- Number of disk read operations per second (
io_read_iops); - Number of disk write operations per second (
io_write_iops).
- Number of disk read operations per second (
For these add-ons, you can configure billing based on statistics. For more details, see the article Billing type.
Add-on "CPU usage intensity"
The "CPU usage intensity" add-on is not available by default. To add the add-on, go to the menu Products → Product types → VPS → Details → Add → specify vcpu_load in the Internal name field. For more details, see the article Product type parameters.
When creating the "CPU usage intensity" add-on template, specify the following parameters:
- Billing type: Based on statistics;
- Value type: Integer;
- Unit of measure: %;
- Tariff plan includes: 50;
- Step: 10;
- Maximum value: 100.
For more details, see the Addon templates article.
Add-on "RAM usage"
When creating the "RAM usage" add-on template, specify the following parameters:
- Billing type: Based on statistics;
- Type: RAM;
- Value type: Integer;
- Internal name:
mem_usage.
For more details, see the Addon templates article.
Add-on "Disk space usage"
When creating the "Disk space usage" add-on template, specify the following parameters:
- Billing type: Based on statistics;
- Type: Disk space;
- Value type: Integer;
- Internal name:
disc_usage.
For more details, see the Addon templates article.
Add-on "Input/output operations"
The "Input/output operations" add-on is not available by default. To add the add-on, go to the menu Products → Product types → VPS → Details → Add → specify iops_usage in the Internal name field. For more details, see the article Product type parameters.
When creating the "Input/output operations" add-on template, specify the following parameters:
- Billing type: Based on statistics;
- Type: I/O operations per second;
- Value type: Integer;
- Unit of measure: Input/output operations;
For more details, see the Addon templates article.
How to add IPv6 subnet
To allow customers to use IPv6 subnets on virtual machines in VMmanager 6, go to Products → select the tariff plan → Config → Add and create the add-on "IPv6 subnet" with the value "Boolean (Yes/No)".
You can enable or disable the add-on "IPv6 subnet" for a certain service in Products → Products/Services → Virtual servers → select the server → Edit → Add-ons → the option IPv6 subnet.
Configuring IPv6 subnet prefix
VMmanager allocates subnets of IPv6 addresses with a prefix from /32 to /125 for virtual machines. To enable the client to choose a subnet prefix when ordering:
- Create a list of prefixes available for ordering:
- Enter Products → Enumerations → IPv6-subnet prefix → Values .
- Press Add and specify the prefix parameters:
- The name to be displayed to the client.
- Internal name. Must be <prefix> or subnet_<prefix>. For example,
124orsubnet_124.
- Add prefix settings to the tariff:
- Enter Products → Tariff plans → select the tariff → Options → Add .
- Create the "IPv6-subnet prefix" addon with the "Enumeration” value type.
To have a default prefix specified in the order without the ability to change it, create the "IPv6-subnet prefix" add-on with the value type "Do not bill".
Adding a bridge
If additional bridges are configured on a VMmanager 6 cluster node, you can create a Bridge addon in BILLmanager. In that case, when you open a VM service, its network interface will be created with the selected bridge. Read more in the VMmanager 6 documentation article Network configuration on the cluster node.
To enable the client to select a bridge:
- Add the addon to the product type:
- Internal name — specify "bridge".
-
- Go to Products → Product types → VPS → click Details.
- Click Add and specify the parameters:
- Add the enumerations:
- Specify the bridge names from VMmanager 6.
-
- Enter Products → Enumerations → select bridge → click Values.
- Click Add and specify the parameters:
- Add an additional resource for the tariff:
- Type — select "bridge".
- Value type — select "Enumeration".
- Enumeration — select "bridge".
- Default value — select the bridge to be used in the default tariff. At the time of ordering, the client can change this value by selecting the value from the list.
-
- Enter Products → Tariff plans → select a tariff → click Options.
- Click Add and specify the parameters:
Selecting the pool for the VM
To allow the client to select the pool from which VMmanager will assign the IP address to the VM:
- Configure the pools available for selection:
-
- Enter Products → Enumerations → IP pool → Values button.
- To add a pool, press the Add button and specify the pool parameters:
- Name — name of the pool in the tariff description;
-
Internal name — the name of the pool in VMmanager.
The internal name "*" means that VMmanager can assign an IP address to VM from any available pool in the cluster.
- Enter Products → Tariff plans → select the tariff → Options button → Add button.
- Create the "IP pool” addon with the type of value "Enumeration".
Sale of backup space
VM image creation is available in VMmanager under the administrator or advanced user account. Only VM backup creation is available from BILLmanager.
In order to sell backup space:
- Go to Products → Tariff plans → Config → Add .
- Select "Client can choose" in the Billing type field.
- Enter any Name, for example, "Space for backups".
- Specify other parameters and click on Ok.
- Go to Products → select the tariff plan → Config → select the newly created add-on→ Prices.
- Create an option that will allow your customers to cancel a disk for backups:
- Specify "Do not bill" in the Billing type field.
- Select the Type "Disk for backup images".
- Select "Integer" in the Value type field.
- Enable the option Custom name and enter a Name of the list element. For example, "Do not buy space for backups".
- Enter "0" in the "Tariff includes" field of the Tariff limits section.
- Click on Ok to save the parameters.
- Create an option to allow your customers to order a disk for backup images:
- Select "Based on order" in the Billing type field.
- Select "Disk for backup images" in the Type field.
- Select "Integer" in the Value type field.
- Select "By the nearest value" in the Values scale field.
- Select the "Only upgrade" in the Resource modification after order field.
- Enable the option Custom name and enter a Name of the list element. For example, "Buy space for backup images".
- In the Tariff limits section, enter parameters according to your needs.
- Click on Ok to save the parameters.
On the order form, you will see the drop-down list "Space for images" with two values. For example:
- Do not buy space for backup images — a free option. Disk space for images won't be allocated.
- Buy space for backup images — a paid option that allows customers to order disk space for images. When a client selects this option, he will see the variants for this add-on on the order form. Its price is calculated based on the parameters specified in the sections Tariff limits and Prices.
Speed limitation in case of overage
BILLmanager allows you to limit the traffic speed to a specified value in case of traffic overrun. The option is available for both incoming and outgoing traffic. When a client's traffic limit is exhausted, BILLmanager notifies VM manager 6. VM manager 6 reduces the client's connection speed to "free" — the minimum speed at which the client can continue to use the services without exceeding the set limits. The feature allows the provider to efficiently manage client traffic, and the client to continue using the service without exceeding the limits, and reduce the cost of the virtual server service.
To ensure correct billing when limits are reached, navigate to Provider → Global settings → Statistics-based → In case of insufficient funds on client's account → select ChargeTo configure the limit for a tariff:
- Go to Products → Tariff plans → select a tariff → Options → Bandwidth → click Edit button.
- Customize the Main settings:
- Select "Based on statistics" in the Billing type field.
- Select "Bandwidth" in the Type field.
- Select "Integer" in the Value type field.
- Enable the option Custom name and enter a Name of the list element if necessary. For example, "Speed limit".
- Specify an Internal name if you want to override the standard service name of the add-on. The default value
in outcounts both incoming and outgoing traffic. To count only one type of traffic, edit the service name. Specify:out— outgoing traffic will be counted;in— incoming traffic will be counted.
Example - Set the Incoming traffic, Kbit/sec limit if necessary. If the field is left blank, the maximum allowable speed of incoming traffic will not be limited.
- Set the Outgoing traffic, Kbit/sec limit if necessary. If the field is left blank, the maximum allowable speed of outgoing traffic will not be limited.
The speed limit for overspending must not be greater than the maximum speed. If the Incoming traffic, Kbit/sec and Outgoing traffic, Kbit/sec fields in the Main settings are filled in, their values cannot be less than the values in the Incoming traffic limit, Kbit/sec and Outgoing traffic limit, Kbit/sec fields in the Overage price section. - If necessary, set the IP Pool for which the settings will be used.
- Customize the Statistics settings section:
- Select for which period to count the Bill resource overuse:
- Per calendar month — select if you want to reduce the speed when the monthly traffic limit is exceeded;
- Per day — select if you want to reduce the speed when you exceed the daily traffic limit.
- Specify how to do the counting if there are Several parameters:
- Sum;
- select the Maximum value.
- Select what the listed price is for in the Price for:
- Item;
- Item per month.
- Bill on suspended service — activate the option so that the customer is charged for the add-on even if the service is stopped.
- Post-paid — activate the option to allow charging for resource overruns without taking into account the client's balance.
- Sum up invoices — activate the option to summarize the parameter value for the entire period when generating the statement of work performed.
- Speed limitation in case of overrun — activate the option to limit the speed of incoming and outgoing traffic in case of overspending. If the option is deactivated, no speed limitation is applied in case of overspending. If the option is disabled while a speed limit is in effect on active services, this limit will be removed according to the rules of the "Limit removal" field.
- Limit removal — select the condition that will cause the speed limits to be lifted:
- Payment for overruns — if this option is selected and the cost of overrun is set for the add-on, then if there is an overrun, an attempt will be made to pay it according to the settings. If the overrun is paid, the restrictions will be removed. If the overrun cost value is 0, no payment will be made and the speed limits will not apply;
- The onset of a new billing period — If this option is selected, the cost of the overcharge and the fact of its payment are not tracked. Restrictions are imposed until the end of the billing period.
Example
- Payment for overruns — if this option is selected and the cost of overrun is set for the add-on, then if there is an overrun, an attempt will be made to pay it according to the settings. If the overrun is paid, the restrictions will be removed. If the overrun cost value is 0, no payment will be made and the speed limits will not apply;
- Incoming traffic limit, Kbps — specify the speed to which incoming traffic should be limited in case of overage.
Since traffic is counted in Mbps on the VMmanager 6 side, the platform rounds up the incoming or outgoing traffic. The field can be left blank, in which case no speed restrictions are applied to the overrun. For example, on the BILLmanager side the value is set to 500 Kbps. On the VMmanager side, the limit will be rounded up to 1 Mbps. - Outgoing traffic limit, Kbps — specify the speed to which outgoing traffic should be limited in case of overrun.
- Limit removal — select the condition that will cause the speed limits to be lifted:
- Select for which period to count the Bill resource overuse:
- Customize the Tariff limits section:
- Unit of measure — select the unit of measure for the amount of traffic.
- Tariff plan includes — enter the amount of traffic that is included in the tariff price. It is displayed in the specified units of measurement.
- Maximum value — set the maximum amount of traffic a customer can order. Once this amount is used, the service will be disabled until the next billing period. The traffic unit is selected in the tariff plan settings. By default, GiB is used.
A client's service may be terminated prematurely if the client has exceeded the limits of additional resources:
- the Tariff plan includes value and there were no funds on the balance to pay the excess;
- maximum value specified in the addon settings.
For more information, see the knowledge base article The service stops spontaneously.
- Included into tariff on a trial period — set the amount of traffic available for ordering during the trial period. You can leave the field empty. In this case, the quantity on the trial period is not limited.
- Maximum value on trial period — set the maximum amount of traffic available for ordering during the trial period. You can leave the field empty. In this case, the maximum quantity during the trial period is controlled by the field Included into tariff on a trial period.
- Customize the Overage price section:
- Overage price — specify the cost per unit of excess.
- Configure the rest of the parameters according to the instructions in the article About tariff plan configuration and click Ok.
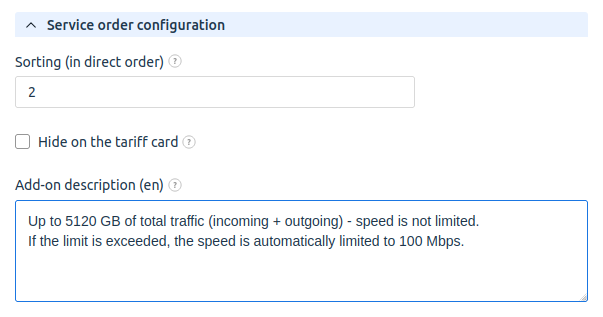
If you need to display that a traffic speed limit is set for the tariff, go to Service order configuration → Add-on Description:
Selling VMs with GPUs
Selling virtual machines (VMs) with graphics processing units (GPUs) using BILLmanager allows to:
- use GPU performance on VMs for user tasks (e.g., machine learning and modeling);
- run graphics-intensive applications (game platforms, computer-aided design systems, image processing programs) on VMs;
- isolate GPU device resources - each GPU device will only be used by a specific VM.
To configure the sale of virtual server services with GPUs:
- On the VMmanager side:
- Create a VM configuration with the Passthrough GPU devices option. For more information, see the article Configurations of virtual machines.
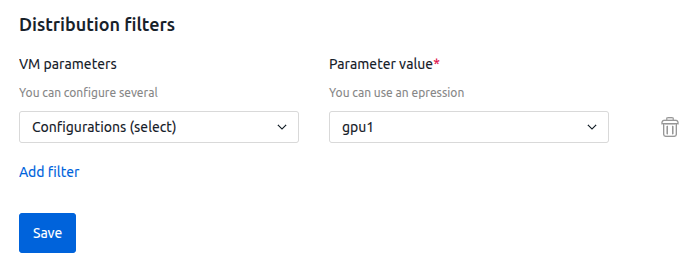
- Add the created configuration to the distribution filters on nodes with GPUs:
- Go to Nodes section → select the node → Parameters button → VM distribution settings tab.
- In the VM parameters field select Configurations (select).
- In the Parameter value field select the created configuration.
- Click the Save button.
- On the BILLmanager side, when creating a tariff, select the created configuration in the VPS template parameter.
You can configure the sale of virtual server services with a specific type of GPU as follows. For example, you need to configure rates for selling virtual server services with RTX 6000 and RTX 4090 devices. To do this:
- Install RTX 6000 devices in one of the cluster nodes (N1). Create the RTX 6000 configuration and specify it in the distribution filters on node N1.
- Create the "Virtual Server with RTX 6000" tariff and specify the VPS template for it — RTX 6000.
- Install RTX 4090 devices in another cluster node (N2). Create the RTX 4090 configuration and specify it in the distribution filters on node N2.
- Create the "Virtual Server with RTX 4090" tariff and specify the VPS template for it — RTX 4090.
May be usefulUseful tips
BILLmanager documentation:
- Operating systems available for order. VMmanager 6
- How to create and configure a tariff plan
- About tariff plan configuration
- Limiting speed in case of overage
- Billing type
- Addon templates
- Service utilization statistics
VMmanager 6 documentation: