 En
En
 Es
Es
With the help of integration you can synchronize users between LDAP and BILLmanager, so that when a user logs in to BILLmanager, the entered data is validated on the LDAP side.
New clients are imported into BILLmanager and the status of existing clients is checked. If a user is blocked in LDAP, after synchronization it will be blocked in BILLmanager as well.
LDAP users can be imported as employees with full permissions, or as clients. The integration supports flexible customization of roles and access permissions.
Only Free IPA and Active Directory implementations are supported.
Integration with ALD Pro is available through the Free IPA connection type.
Installing the module
To install the module, enter Integration → Modules → LDAP → click Install.
Connection settings
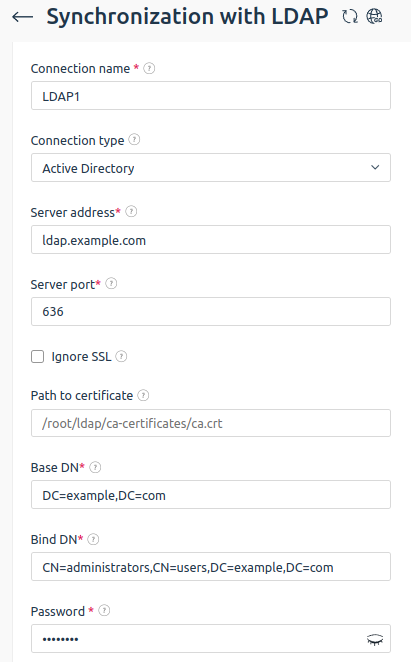
To configure synchronization with LDAP, enter Integration → Synchronization with LDAP:
- Provider — select a provider;
- Connection name — specify the name of the connection;
- Connection type — select the LDAP implementation
- FreeIPA;
- ActiveDirectory.
- Server address — specify the path to the LDAP server;
- Server port — specify the port to connect to the LDAP server;
- Ignore SSL — activate the option to not check the presence and validity of the SSL certificate;
- Path to certificate — Specify the path to the CA certificate file on the server. Typically specified for self-authenticated certificates or certificates that are not installed on the server;
- Base DN (Distinguished Name) — specify the directory object starting from which the search is performed;
- Bind DN (Distinguished Name) — specify the LDAP user on whose behalf LDAP queries will be performed;
- Password — enter the user password to connect to the LDAP server.
You can switch between the synchronization settings sections using the right-hand menu:
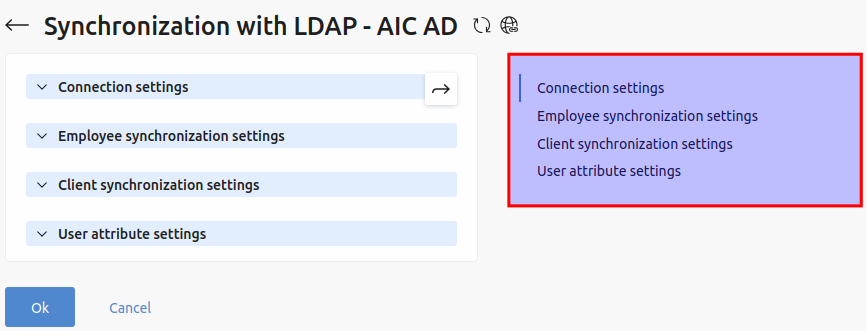
Synchronization setup
Synchronization of employees
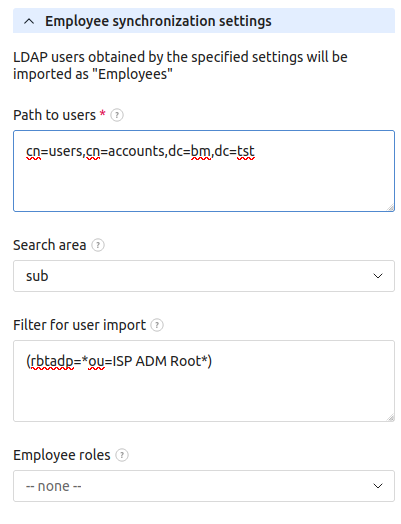
To import LDAP users as employees, specify:
- Path to users — specify the path to the users to be imported as employees. Use the ADSI connection string syntax to write;
- Search area — specify the search area relative to the users path:
- one — search for child records one level down;
- sub — search through all child records to the full depth of the hierarchy, including the record pointed to by the user path;
- children — search similarly to sub, but without the record pointed to by the users path;
- base — search only on the record pointed to by the users path;
- Filter for user import — used in LDAP server queries when requesting a list of users. If a user matches the filter criteria, the corresponding role will be assigned to the user. Multiple roles can be assigned to one user. To add a filter by user group, use the (memberOf=) construct. For example, if the path to users is cn=admins,cn=groups,cn=accounts,dc=example,dc=com, specify the filter (memberOf=cn=admins,cn=groups,cn=accounts,dc=example,dc=com).
- Employee roles — select one or more roles for employees matching the filter criteria. For example, “Support employee” and “Accounting employee”. For more information on how to configure roles, see the article Configuring roles forDCImanager 6 users. Added the ability to transfer an IP address from one service to another within a location. For more information on how to customize roles, see the article Setting user roles.
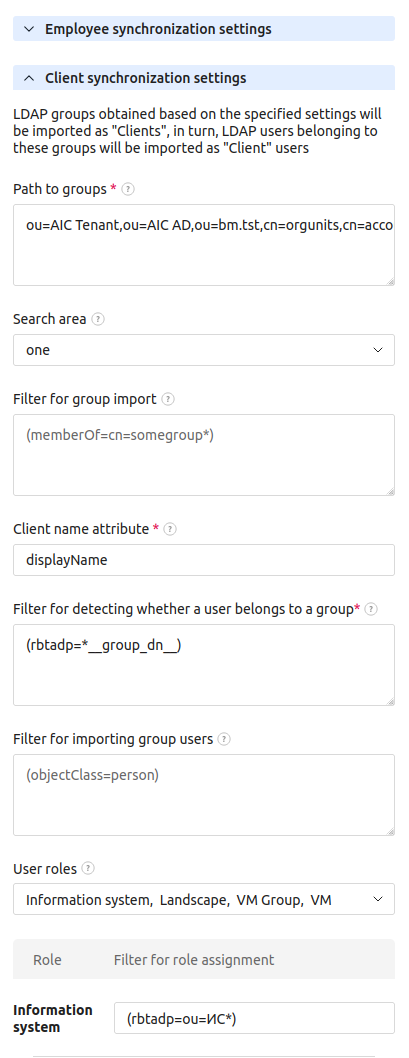
Synchronization of clients
LDAP groups obtained by the specified settings will be imported as "Clients". LDAP users who are in these groups will be imported as "Client" users.
- Path to groups — specify the path to the groups to be imported as clients. Use the ADSI connection string syntax to write;
-
Search area — specify the search area relative to the users path:
- one — search by child records one level down;
- sub — search by all child records to the full depth of the hierarchy, including the record pointed to by the path to users;
- children — search similarly to sub, but excluding the record pointed to by the path to users;
- base — search only by the record pointed to by the path to users;
- Filter for group import — used in queries to the LDAP server when requesting a list of groups;
- Client name attribute — specify the name of the attribute on your LDAP server that stores the name of the group. For example, CN;
- Filter for detecting whether a user belongs to a group — is used in LDAP server queries to determine whether a user belongs to a group; if the user matches the filter conditions, he/she will be imported as a client user. The __group_dn__ macro can be specified in the filter — when the query is executed, the macro will be replaced by the dn of the group obtained from the data specified above;
- User import filter — used in LDAP server queries when requesting users of a group that is being imported as a client.
- User roles — select one or more roles for users matching the filter criteria and specify a Filter for role assignment. For example, "Content curator", "Data Analyst", or "Developer". For more information on how to customize roles, see the article Setting user roles.
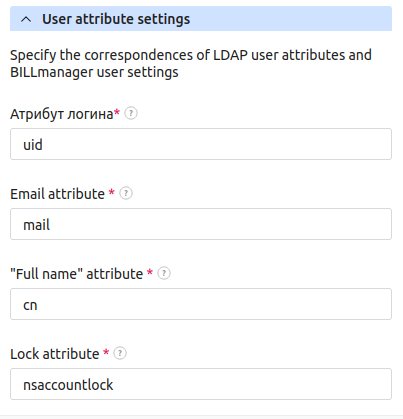
User attribute settings
Specify correspondences between LDAP user attributes and BILLmanager user parameters:
- Login attribute — the name of the attribute on the LDAP server that stores the user's login, such as uid;
- E-mail attribute — the name of the attribute on the LDAP server where the user's email is stored. For example, mail;
- Full name attribute — the name of the attribute on the LDAP server that stores the user's full name. For example, CN;
- Blocking attribute — the name of the attribute on the LDAP server that is responsible for blocking the user.
Deleting
To delete synchronization with LDAP, enter Integration → Synchronization with LDAP → select the connection in the list → click Delete.
Removing LDAP integration does not affect synchronized users.
Synchronization
Synchronization is triggered once a day by a cron job:
0 0 * * * /usr/local/mgr5/sbin/mgrctl -m billmgr crontask action=ldap.sync sok=ok sok=ok >/dev/null 2>&1To start synchronization manually, click Synchronize in the list of connections.