 En
En
 Es
Es
You can configure Telegram integration so that customers can contact support with requests via the bot you created.
Configuration on the Telegram side
Create a bot in Telegram. To do this:
- Go to the link https://t.me/BotFather or search for it in Telegram — @BotFather.
- Start the bot using the
/startcommand. - Create your bot using the
/newbotcommand. - Enter the bot name. For example,
Notify Me. - Enter a unique username for the bot. It must end with
bot. For example, notifyme876bot. - Save the bot name and the token value from the response.
-
To allow the bot to send messages to a Telegram group:
- Add the bot to the group.
- Enter any command in the group chat. For example,
/start.
- To allow the bot to send messages to a Telegram user, the user must open a dialog with the bot and click Start.
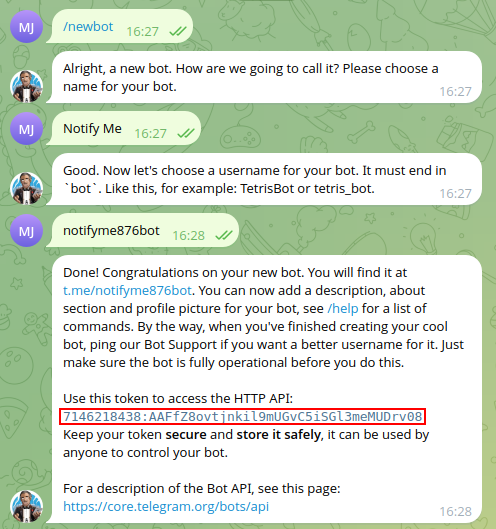
Bot creation example
Configuration on the BILLmanager side
On the provider side
To install the module, go to Integration → Modules → select Telegram → Install button.
To configure the module, go to Support → Telegram → click Add:
- Select the Provider.
- Specify the Bot name in Telegram.
- Specify the bot Token.
- Specify the Telegram API URL. Leave the field empty if you do not use third-party proxies for Telegram.
- In the Webhook URL field, enter an address in the format
https://URL_BILLmanager/mancgi/telegram_support_webhook. Telegram will send webhooks to this address confirming that the customer and the bot are linked. You can leave the field empty. In this case, the address of the server with BILLmanager will be used. - Select the Use proxy option if you need to send requests via a proxy server. When the option is enabled, specify:
- Proxy URL — the address of the proxy server. For example,
socks5://host:1080,socks5h://host:1080, orhttp://host:8080; - Username — the username for authorization on the proxy server;
- Password — the password for authorization on the proxy server.
- Proxy URL — the address of the proxy server. For example,
- Click Ok.
The added Telegram bots and their status are displayed in the table.
You can perform the following actions with the bots:
- edit;
- delete;
- enable or disable.
On the customer side
To work with Telegram, the customer specifies the login of their Telegram account (without @) in the User settings. For more information, see the article Notifications.
The settings display the enabled bots for receiving notifications and working with support.
Working with tickets
The following commands are used to work with the bot (the argument is passed via _, /command_value, for example /ticket_159):
/start— a list of user tickets with the ability to select a ticket;/ticket_{ticket number}— ticket information, including the last message with attached files. The following actions are available:- Add a reply. The maximum message length is 255 characters and no more than 5 files;
- Archive. The button appears for tickets in the "Waiting for customer response" status.
/createticket— creating a new ticket. When creating a new ticket:- The customer selects a provider if there are multiple providers and the customer uses services from different providers.
- The customer selects the department to which the request will be directed.
- The system checks whether paid support for prepaid requests is configured for them. If it is configured, it checks whether the customer has prepaid requests. If not, it displays a message that it is impossible to create a request.
- The customer selects the service for which the problem occurred.
- The customer writes the request subject.
- The customer writes a message about their problem. The customer can attach up to 5 files.