At this stage, you need to configure products that you will sell via BILLmanager. The system must "understand" how to create a service, what resources the service consumes, and how much it costs. To do this, you need to:
Add a processing module.
Configure resources.
Configure a tariff plan.
A service in BILLmanager is a product or service that a provider offers to clients through the billing system. This can be hosting, a domain name, VPS, SSL certificate, or another IT service. A service includes a set of parameters and resources that determine its characteristics and cost, automation mechanisms that allow efficient service provisioning.
Step 1. Connecting a processing module
Service processing module in BILLmanager is a module that manages the service lifecycle:
activation;
parameter change;
suspension and deletion.
Processing module ensures integration with various services and manages processes related to service provisioning. Processing modules can be configured:
for automatic service processing via API requests — it can be configured via the interface. Use this option to get started;
manually using scripts — used in non-standard scenarios. If you do not know why you need this — use connection via the interface.
Data center is a logical group of servers united in BILLmanager for service management, load distribution, and tariff plan association.
Some service processing modules require a data center to be created in BILLmanager:
Enter Integration → Data centers → click Add.
Specify the Name of the data center.
Specify the External data center id — for correct operation of some processing modules, it is necessary to specify data center identifier from the external system. For example, for DCImanager 6 it is the location identifier and for OpenStack VDS it is the value "Region".
Specify the Sorting order.
To display an icon next to the data center name, activate the Use icon option. You can Set the country's flag as the icon or upload your own image.
Click Ok.
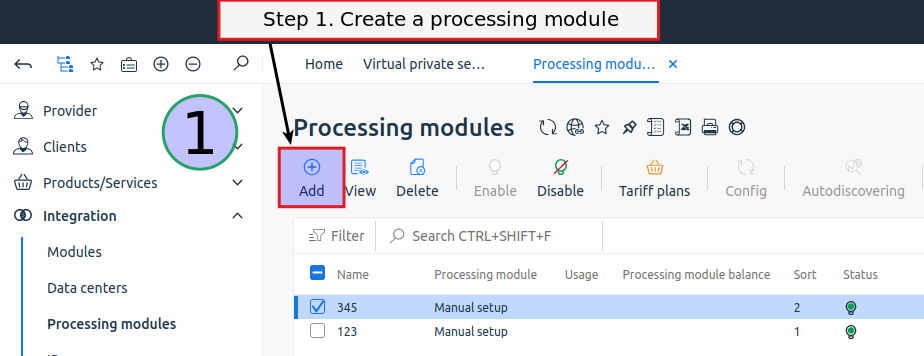
Creating a processing module
To create a processing module for selling services, go to the section Integration → Processing modules → click Add.
Configuring VMmanager 6 processing module as an example
VMmanager 6 processing module will require a data center in BILLmanager during configuration. To create it, go to the section Integration → Data centers → click Add. Do not fill in the "Data center external identifier" field.
Service processing module configuration form:
Product type — select "VPS".
Processing module — select "VMmanager 6".
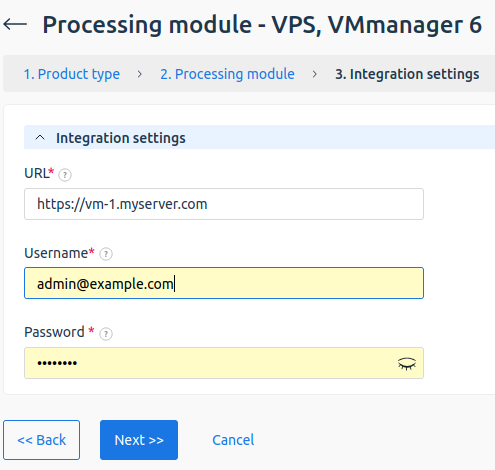
Integration configuration. Specify data for integration:
URL — domain or public address of the server with VMmanager 6.
Username — email of the VMmanager 6 administrator. Use the account of the first user created after VMmanager 6 installation.
Password.
Processing module parameters. Specify internal (within BILLmanager) parameters of the service processing module.
Data center — name of the data center in BILLmanager to which the processing module will be connected.
Name — name of the processing module for display in the BILLmanager interface.
Department — department in BILLmanager to which tasks from the processing module will be assigned.
Sorting — processing module priority. The lower the value, the higher the position in the list. If multiple processing modules are connected to a tariff plan, when creating a service, the processing module with the lower sorting value is selected first.
Cluster — VMmanager cluster in which virtual machines (VMs) will be created.
Use recipes — enable the option if additional software needs to be installed on the VM or a script needs to be executed. For more information, see the article Installing additional software (recipes). VMmanager 6.
Additional network interface — enable the option if a second network interface needs to be used on the VM. For this, the main and additional network interface must be configured on the VMmanager cluster.
The service processing module is bound to one of the VMmanager clusters. If you plan to sell servers with different types of virtualization, connect two processing modules — one for the KVM cluster, the other for the cluster with LXD virtualization.
Processing module parameters. Use default parameters. For more information, see the article Processing module. VMmanager 6.
Number of queues — sets the maximum number of simultaneous operations specified via the "Queue key" parameter. Works together with the "Run operations in queue" and "Queue key" options.
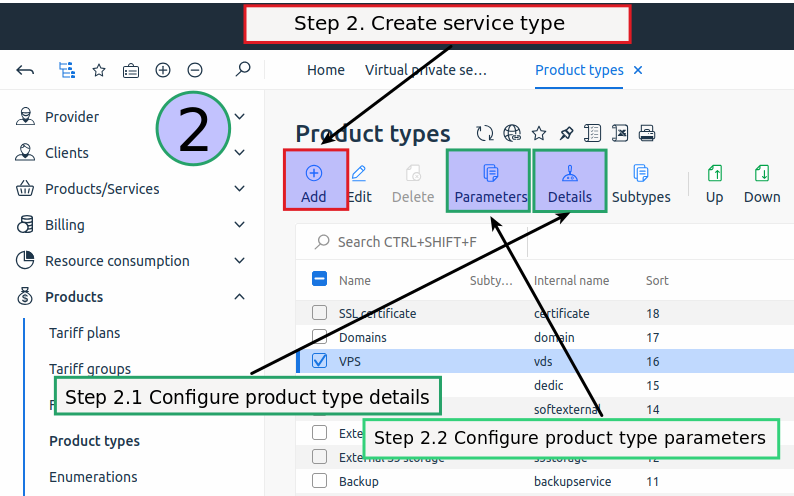
Step 2. Configuring service resources
By default, BILLmanager already has a set of product types defined, and a certain number of resources and necessary parameters are configured for them. You can change the settings for the product type at your discretion. Let's consider the settings using the VMmanager 6 processing module as an example — this is the VPS product type with the internal name vds.
To configure the product type, go to the section Products → Product types. For more information, see the article Product types.
Configuration using VPS service type as an example
Select VPS → click Edit. On the form, pay attention to the settings in the blocks:
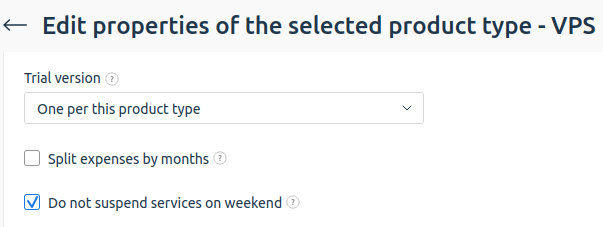
Main settings
Trial version — select the method of providing clients with a trial version of services of this type. Available values:
One per this product type — the client can order one trial version of a service with the type "Virtual server";
One in every product group — the client can order one trial version of services from each tariff group. Tariff groups are configured in the section Products → Tariff groups;
One per tariff plan — the client can order one trial version of a service in each tariff with the type "Virtual server";
For every service — a trial period is available to the client on each new service.
Split expenses by months — activate the option to evenly distribute the cost of the service usage period across months.
Example
For example, on the provider side for shared hosting, the option Split expenses by months → From the 1st of each month is active. On August 15, 2024, the client ordered a shared hosting service for three months, until November 15, 2024. Expenses are split by the following service provision dates:
08-15-2024 (expense for part of the current month);
09-01-2024 (expense for the whole month);
10-01--2024 (expense for the whole month);
11-01-2024 (expense for part of the month until the 15th).
Do not suspend services on weekends — activate the option so that service provisioning is not suspended on weekends.
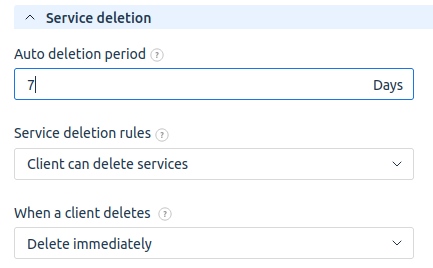
Service deletion
Auto deletion period — set the period for automatic deletion of unpaid services. Specified in days.
Service deletion rules — select the policy for deleting services of this type by clients:
client can delete services;
client is prohibited from deleting services;
client can delete services with verification via verified phone.
When a client deletes — select the rule for deleting services of this type by the client:
delete immediately;
delete after the end of the paid period.
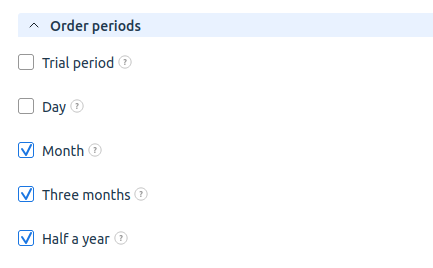
Order periods — mark the periods that clients will be able to select when ordering a service. Description of some payment periods:
Trial period — option for providing clients with a free period of using services of this type.
One-time — the period implies that the client makes a payment for a service of this type once at the time of purchase.
Day — payment for the service will be charged daily. For more information on the operating mechanism, see Billing Cycle.
Month — payment for the service will be charged monthly. For more information on the operating mechanism, see Billing Cycle.
Tariff selection step — settings from this block regulate the display of the product type and its tariffs on the order page.
Configure Content of the product type — service resources in BILLmanager. Resources can be, for example, traffic, RAM, mail domains, etc. The set of resources can vary depending on the provided service. For more information, see the article Product type content.
Configure Parameters of the product type — data that needs to be obtained for the service to work. The set of parameters for configuration can vary depending on the provided service. For more information, see the article Product type parameters.
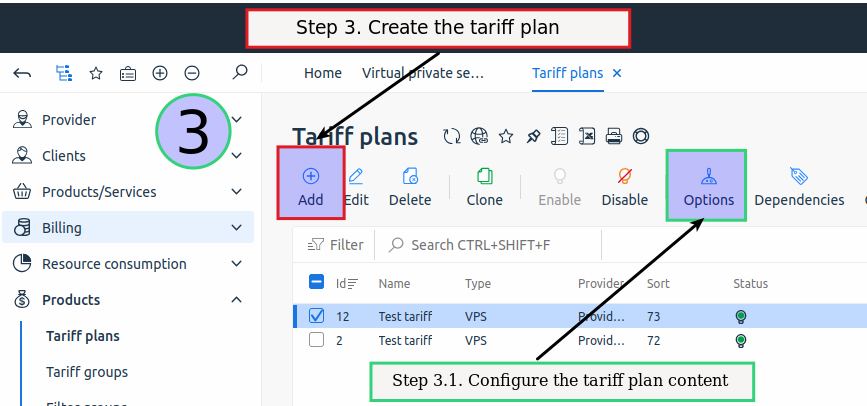
Step 3. Creating and configuring a tariff plan
Tariff plan for the client is a set of resources that the provider provides or sells together with the service.
Create a tariff plan, to do this go to the section Products → Tariff plans → Add button. For more information, see the article How to create and configure a tariff plan.
Configuration using a tariff for VPS service as an example
Product type — select "VPS". If you enable the flag Activate after creation, then ordering a service by the created tariff will be available immediately after exiting the tariff plan addition wizard.
Select the provider that will use the created tariff plan. After completing the configuration, it is impossible to assign the tariff to another provider.
Tariff plan parameters:
Main settings block:
Name — specify the tariff name.
Processing module — select processing modules that will process services of this tariff plan.
VPS template — specify the name of the template by which the virtual machine (VM) will be created in VMmanager. The configuration of the virtual server depends on the template. Creation and configuration of the template is performed on the VMmanager side, page Templates → VM Configurations.
Create all add-ons — enable the option to automatically add resources to the tariff content.
Additional settings block:
Default domain template — template for generating a domain if the client did not specify their own when ordering a service.
Prices block — specify the price for periods available for order.
The Policy block can be configured later.
Configure the tariff content — a set of resources available in the tariff. To configure the tariff plan content, go to the section Products → Tariff plans → select the tariff plan → click Options. For more information, see the article About tariff plan configuration.
seful tips
Related topics:
Key terms — who is a provider, client, etc. in the BILLmanager system;
 En
En
 Es
Es